Pages

Wednesday, 28 November 2018

Baby Frock Beautiful Dress for Girls


Today we going to share a new and easy baby dress/frock .this crocheted frock dress making in little time easy to change others sizes as you want to make. This adorable crochet design dress you can also use for wedding and other occasions. We made many of the baby dress design for new born to other many sizes only share with you, my new ideas for those who want to knew and share for beginner crocheter want to learning and making things in home.


The Crochet pattern share with the same video instruction. This cute and easy pullover wears for little girls are perfect them in both season spring fall winter. Those simple adorable designs work up so quick and easy. To begin by watching the video on working how to make and change the size of dress.


We always give you easy instructions for this crocheted baby design for girls. Choose any of sweet color (light DK 100% acrylic) 3mm hook. For large size use larger hook and do more chains. Every color is perfect for this beautiful frock. This easy idea you can change in small or large. Only add more chains for larger sizes or less for small size.

These beautiful and easy girl dress frock pattern crocheted for you special who want to learn in home or gift to someone. Hope you will be enjoy and write about me, like, share to friends and also share on your face book page and your Pinterest. Thanks for watching and following.


Baby beads summer sandals pattern 

New Baby Booties Pattern

we shared a baby crocheted booties slipper to make with same video tutorial, 

Baby Beaded crochet shoes will looks beautiful on little feet and make more stylish her personality. Try to make for the little ones. We love crochet and share free pattern whole of the years for babies, girls, boy’s pattern for ladies and adult pattern. The baby beads sandals link below click on the link to get the

 baby sandals pattern


Item to be need:
Light Wool #3 ply ( 5 double crochet = 1 inch )

Crochet hook size 3.5mm/E-4

Size:   Toddler 3-4 years

Gauge:  5 dc x 2.5 row = 1 inch with hook sizes 3.5 mm(E-4)

Special stitch:
1.       Do stitch marker 4 points for armholes
2.       Ch3 as count for double crochet.
3.       Check out the size of the chest before working on the skirt
4.       Ch1 not count for single crochet

US Terms Abbreviation
c.           crochet
ch.         chain
sc.          single crochet
dc.         double crochet
slst.       slip stitch
st.          stitch
sts.        stitches
Rnd.       round
Rpt.        Repeat
Ch-sp.    Chain space
Skp.        Skip/miss

Written Pattern.

Start from the neckline.
make Ch100. Don’t twist the chain do slst in 1st ch. make a ring. For small size do less chains and for
Large sizes add extra more chains.

Note. Into first chain round we working in back ridge of the chains, leave first 2 loops for
the nice edge.
Round1.     Ch3, 1dc in each ch into back ridge across to end, do slst into 3rd ch. (100)
Round2.     Ch4, skp next st, *dc in next st, ch1, skp next st*, rpt from * to * around,
                   do slst in 3rd ch.
Round3.    (INC)Ch3, *2dc into next ch-sp, dc into next st*, rpt from * to * around,
                  do slst into 3rd ch.
Round4.     Repeat (Rnd 2)
Round5.     Ch3, *1dc into next ch-sp, 1dc into next st*, rpt from * to * around, do slst into 
                   3rd ch.
Round6-8.  Repeat ( Rnd 4 & Rnd 5)
Round9.     (INC)Ch3, *2dc into next ch-sp, 1dc into next st, 1dc into next ch-sp*, rpt from 
                   * to * around, do slst into 3rd ch.
Skirt.

Divide stitches for armhole. Stitch mark 44 sts for both side  armhole.

Round1.     Ch1, sc in same st, * ch 5, skp next 2 sts, sc in next st*, rpt from * to * 10 time 
for back,Leave or skip 44 Sts for armhole, do 1sc next st, repeat * to * 20 time for front, 
leave or skip 44 sts for 2nd armhole, do 1sc next st, repeat * to * 10 time across to end. 
Do Slst in 1st sc.

Round2-4.  Slst in next 2 chains, sc in same sp, *ch5, do sc next ch-sp*, rpt from * to * around,
do slst in 1st sc .

we are going to add pattern. We will need 4 rounds for each patterns

Round2.     Slst in 1st ch- sp, ch3, do 8 dc in same sp, *sc in next ch-sp, shell 9 dc in next 
ch-sp*,Rpt from * to * around. Do slst in 3rd ch, slst in next st.

Round3.   ch4, [*dc in next st, ch1*, rpt * to * total 7 time], skp last dc st, skp 1st dc st
in next shell, repeat *to * 7 time into middle 7 sts in each shell around. Do slst in 3rd ch,
sc next ch-sp.

Round4.   Ch3, sc in next ch-sp*, rpt * to * 5 time in each shell around,  Do slst in 1st sc,
slst next 3 ch,s, slst next ch3- sp.

Round5.   Sc Into same ch-sp, *ch5, skp next ch3-sp, sc in next ch3-sp, ch5, skp last ch3-sp,
Skp 1st ch3-sp of next shell, do sc next ch3-sp. Rpt from * to * around, Do slst in 1st sc.

Round6.     Repeat (Rnd 2 )

Do and continue 4 rounds of this pattern ( Rnd 2, Rnd 3, Rnd 4, and Rnd 5)
Do and continue to the desire length of frock/dress.
We repeated total 10 pattens for this dress.  you will need total 40 rounds). Fasten off

you may also like the new pattern 


Thursday, 25 October 2018

Saturday, 13 October 2018

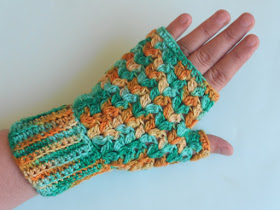
Super Fast Easy Crochet Gloves


These crochet finger less gloves are my favorite! I am showing you a very basic and finger less gloves free pattern with same video tutorial. We will go to share some new and adorable gloves free patterns. 
These finger less gloves are so fun to make and more enjoyable to wear and keep your hands warm in the cold season. Every design is unique and stylish pairs of gloves. My entire gloves pattern is different to each other. Every design are making in different colors and pattern. It’s got a little time to making, in a day you can make a different glove with new pattern. It’s very quick project, easy and simple design to making. I made them in myself with my own way, with video tutorial can help you to learn on how to make those beautiful easy finger less hand warmer.


Some time when we making things we are confuse to choosing the colors, as a designer” I think all of colors is best for the crocheting things, but the stitching is so fair and nice. I always want to give you some pleasure in my easy crocheting, and glad to see you’re involving in my design.
So I hope you Enjoy to get this free crochet patterns for finger less gloves or wrist warmer. Use them for chilly winter days or give to friends as a gift. Share my free pattern on Pinterest and your face book page. i hope you would like more for Ladies/Girls Hand warmer pattern.


Gauge:        after Finishing. Length = (8.5 inch)
                      Width = (3.5 inch)
Half white Yarn worsted 4 ply (16 to 20 sts= 4 inch)
3mm crochet hook
Special st:    single crochet in 1st stitch, double crochet in next stitch.

Pattern:
Round1.  Ch42, do hdc in 3rd ch into backside 3rd loop, do hdc in each st into 3rd loop across,
 turn. (40 sts)
Round2.    Ch1(not count)sc in same st, *dc in next st,sc in next st*, rpt from * to * across,
turn.(40 sts)
Round3.    Ch1 (not count)hdc in same st, 1hdc in each st across, turn. (40)
Round4-26.   Repeat (Rnd 2,& Rnd 3).
Do and Continue work as rnd2 and 3 to your desire width of hand palm. Fasten off
Finishing.   Fold the rectangle piece in half way,(watch the video tutorial) sew 13 stitches
from the Top join 2sts together do slst in each 13 sts, and close the last st. leave 6 sts for
thumb space, then rejoin yarn in next st, do slst in each st across to end.
Weave all ends and enjoy easy gloves pattern.

watch the next gloves pattern:


Friday, 5 October 2018

Easy Baby Cuffed Booties Free Pattern


Welcome friends! Today we going to share a new and stylish crochet winter baby beaded shoes .this shoes crocheted for babies for new born to 3 months. This adorable crochet booties made in new and modern style for cold season to protect babies’ feet from chilly . We made many of the baby sandals and booties, slipper design for new born to other many sizes only share with you and for share my new ideas for those who want to learn and share for those beginner crocheter want to learning and making things in home for the babies.
These Crochet pattern baby pompom booties made and share with the same video 


This cute and easy footwear for baby girls or baby boys are perfect them in both season spring and winter. Those simple adorable designs work up so quickly and easy. To begin by watching the video.

These beautiful baby crocheted booties slipper are such fun to make with the same video. The pattern made in one size for 0-3 months. These pairs baby beaded crochet shoes will looks beautiful on little feet and make more stylish her personality.try and make for the little ones. We love and share free pattern whole of the years.
We provide you easy instructions for crochet baby booties only for 0-3 months’ choose two of any colors half white and peach (light baby DK 100% acrylic) with 3mm hook and use some of plastic beads for these baby pattern; you also choose other colors for this pattern. I think every color is perfect match for these small items.

These beautiful and easy baby foot wear pattern crocheted for the small and cute babies. Hope you will be enjoy this pattern so, please write about me, like, share to friends and also share on your Facebook page. Thanks for watching and following.


Item to be need:
Two colors of yarn: half white and peach colors (Light Weight Wool #3 ply)
Crochet hook size 3.00 mm

Size:      0-3 month’s baby
Gauge:  5 dc x 2.5 row = 1 inch

Pattern for gauge:  
Length of sole=3.5 inches

Special stitch:
1.       Do stitch marker on the back side
2.       Ch3 as count for double crochet.
3.       Check out the size of the sole before top part working.
4.       Ch1 as count for single crochet

US Terms Abbreviation
c.           crochet
ch.         chain
sc.          single crochet
hdc.       Half double crochet
dc.         double crochet
slst.       slip stitch
st.          stitch
sts.        stitches
Rnd.       round
Rpt.          Repeat

Follow size changing chart:

0-3 months: chains 12/ Size of sole length 3.5 inches/ 9 cm

3-6 months: chains 13/ Size of sole length 4 inches/ 10 cm

6-12 months: chains 14/ Size of sole length 4.5 inches/ 11 cm

12-24 months: chains 15/ Size of sole length 5 inches/ 13 cm

 Pattern:
To start working from the sole:
Round1:     ch12, 2dc in 4th ch from the hook, dc in next 7 ch,s, 6dc in last ch,
Work in opposite side:
                   dc in next  7sts, 3dc in last st, slst to join in 1st dc. (26)

Round2:     ch3, dc in same st, 2dc in next 2 sts, dc in next 7sts, 2dc in each st into 6 sts group,
Work in opposite side:
                   dc in next 7 sts, 2dc in each st into last 3sts group, slst to join in 1st dc. (38)

Round3:     ch1, hdc in same st, 2hdc in next st, (1hdc, 2hdc) rpt 2 times in next 4 sts, 1hdc in 
                   each next 7 sts, (2hdc, 1hdc)rpt 6 times  in each next 12 sts,
Work in opposite side:
                  1hdc in each next 7 sts,(2hdc, 1hdc) rpt 3 times in each next 6 sts, slst to join in 1st
                  hdc. (50).Fasten off
Body of the shoes:
Round1.     Working on wrong side of the sole, make ch2, 1dc into post of hdc, do idc in each st
                    into post of hdc around the sole, slst in top of 1st dc.(50)
Round2.     Ch2, 1dc in each st around, slst in top of 1st dc. (50)

Do stitch marker on 21 sts front of the toe. (Watch the video)
Round3.   Ch1, hdc in each st into 15 sts to next st marker, *dc tog in next 2sts, 1dc in next st*, 
                rpt from * to *6 time more in next sts across to next st marker,1hdc into remaining 
               14 sts, slst into 1st hdc. (43)
Do stitch marker on 18 sts front of the toe.
Round4.   Ch1, hdc in each st into 14 sts to next st marker,*dc tog in next 2sts, 1dc in next st*, rpt
                  from * to *5 time more in next sts across to next st marker,1hdc into remaining sts, slst
                  into 1st hdc. (37)
Round5.   Ch1, sc into same st, sc in each next 12 sts, [sc tog next 12 sts, make ch1 to close
                 the st], sc each remaining 12 sts across to end, slst in top of sc. (25).
Fasten off

Make upper part of the shoe.
Change color B.
Round1.     Join yarn into next st from the sc tog st,(watch the video)ch1, sc same st, sc in each
                   next 24 sts across to end of the other side, turn.(25)
Round2-8. Ch1 (as count), skp 1st st, sc in each next 24 sts across to end, turn. Fasten off

Make edge of the top part.
Finishing.    For the edge, Join yarn into base of the last st of the 1st sc round, do 1sc into edge of 
the Side, do 1sc in each 24 sts across into top of the round, do 1sc in each st across to the 2nd
side edge.Fasten off weave all ends. Make small pom pom woolen ball and sew at the middle
of the booties For the little girl sew some of plastic beads at the front of the shoes.

Saturday, 22 September 2018

How To Make Crochet Baby Booties/Shoes


These Crochet pattern baby sandals made and share with the same video instruction. This cute and easy footwear for baby girls are perfect them in both season spring and summer. Those simple adorable designs work up so quickly and easy. To begin by watching the video on working how to grow up.


Here we share new and stylish crochet baby booties .this shoes crocheted for babies are sweet accessory all season. Those adorable crochet baby shoes made in new and modern style to protect babies’ feet in winter, it gives happy. We made many of the baby design for new born to other many sizes only share with you, and for share my new ideas for those who want to get new ideas and also share for that beginner crocheter who wants to learning and making things in home for the babies.


These beautiful baby crochet shoes are such fun to make with the same video. The pattern made in one size for 0- 1 month new born baby. These pairs baby crochet booties  will looks beautiful on little feet and make more stylish her/ his personality.try to make for the little ones.
We always give you easy instructions for crochet baby items. Those pairs only for 0-1 month new born baby size. Choose any of two of the color (light baby DK 100% acrylic) and 3mm hook. You also choose other colors for this patterns you want to use. I think every color is perfect match for these small items.
These beautiful and easy baby booties pattern crocheted for the small and cute little ones. Hope you will be enjoys getting this pattern. Write about me, like, share to friends and also share on your facbook page. Thanks for watching and following.


Item to be need:
Two colors of yarn: Baby pink and Red colors (baby DK double knit Acrylic yarn 4 ply
 (20 stitches = 4 inches)
Crochet hook size 3.00 mm
Size:   0-30 days (new born baby)
Gauge:  5 dc x 2.5 row = 1 inch
Pattern for gauge:  
Length of sole=3.2 inches
Special stitch:
1.       Do stitch marker on the back side
2.       Ch3 as count for double crochet.
3.       Check out the size of the sole before top part working.
4.       Ch1 as count for single crochet

US Terms Abbreviation
c.           crochet
ch.         chain
sc.          single crochet
hdc.       Half double crochet
dc.         double crochet
slst.       slip stitch
st.          stitch
sts.        stitches
Rnd.       round
Rpt.          Repeat

Pattern:
To start working from the sole:
Round1:     ch11, 2dc in 4th ch from the hook, dc in next 6 ch,s, 5dc in last ch,
Work in opposite side:
                   dc in next  6sts, 2dc in last st, slst to join in top of 3rd ch. (22)
Round2:     ch3 (as count), dc in same st, 2dc in next 2 sts, dc in next 6 sts, 2dc in each st into 
                   5 sts group,
Work in opposite side:
                   dc in next 6 sts, 2dc in each st into last 2sts, slst to join in top of 3rd ch.(32)
Round3:     ch1 (not count), hdc in same st, 2hdc in next st, (1hdc, 2hdc) rpt 2 times in next 4 sts,
                  1hdc in next 6 sts, (2hdc, 1hdc) rpt 5 times in each next 10 sts,
Work in opposite side:
                  1hdc in next 6 sts, (2hdc, 1hdc) rpt 2 times in each next 4 sts,
                  slst to join in 1st hdc. (42). Fasten off

Note.   into wrong side of the sole we are working post of hdc sts.      
Round4.     Ch1, sc post of hdc in wrong side, 1sc each st around post of hdc sts, slst to join
                   in 1st st.

Working in front.
Stitch mark 20 sts for the front.
Round1.     Join next color in st marker st, work dc tog, ch2, dc next st, *1dc in next st, *dc tog in
                    next 2sts*,Rpt from * to *across to next st marker st, turn.
Round2.     Ch2, *dc tog next 2 sts, 1dc next st*, rpt from * to * across, turn.
Round3.      Rpt (Rnd 2).

Don’t stop working continue work and make the front flap.
Round1-5.  Ch2, 1dc in each next 4 sts, turn. Fasten off

Start working on back side heel part.
Round1.     Join same color to next st from the front last st, ch2, dc in each st across to end of the
                    back side last st, turn.
Round2.     Ch1, skp 1st st, dc in next st, 1dc in each st across, dc tog in last 2sts.

Work Button strap for left shoe.
Round3.    At the end of Rnd 2, make ch14, dc in 4th ch, dc in each ch across, work 1dc in each st
across into backside. Fasten off

Work Button strap for right shoe.
Round3.    Ch2, dc in each st across into back side, the end of rnd3, make ch14, dc in 4th ch, 1dc
in each ch across, slst. Fasten off

Finishing.    Join next color into corner st of the front flap, ch1, sc across into side of the front,
at the end sc tog 1 time into front and back side 2sts, work 1sc in each st across at the back side
and button strap, then to reach the bottom of back side and front, work to the same as other side,
sc tog into front and back side 2sts, work 1sc in each st across into front to end.
(by watching the video)


Monday, 10 September 2018

Beautiful Baby Cardigan Sweater with Pants Easy Pattern


Today we share a new crochet baby jacket round neck .this crocheted sweater sweet accessory every season for newborn to large . This adorable crocheted design made in new and modern style for both season spring and winter. We made many of the crocheted baby design for new born to other many sizes only share with you, my new ideas for those who want to learn. i will give and share for beginner crocheter those who want to learning and making things in home.

This Crochet pattern full set we made in same design share with the same video instruction. This cute and easy pullover wear for little girls are perfect them to warm in cold weather. Those simple adorable designs work up so quick and easy. To begin by watching the video on working baby sweater jacket.
instructions:   I give you easy instructions for this crocheted sweater design new born baby 0-3 months. Choose any of two colors (light DK 100% acrylic) 3mm hook. we used baby pink and red to combine the coat jacket sweater.For large size use larger hook and do more chains when you starting from the neck line. Every color is perfect for this cutest design. This easy idea you can use for large and more lager size. Only add more chains for large sizes.

These beautiful and easy girl sweater pattern crocheted for you special who want to learn in home or gifted to others. Hope you will be enjoy to find this easy jacket, so test it and write about me, like, share to friends and also share on your face book page and your pinterest. Thanks for watching and following.


Item to be need:
baby pink and red colour ( DK double knit Acrylic 100% yarn 4 ply (16-20 stitches = 4 inches)
Crochet hook size 3.00 mm
small 3 buttons

Size:   0-3 months 

Gauge:  4dc x 2 rows = 1 inches
Pattern for gauge:  
Length top to down.11.5 inches
Chest .9.5 inches
length -10.5 inches
Sleeve length under armhole to cuff. 5 inches

Special stitch:
1.       Do stitch marker 4 points for corner shells
2.       Ch3 as count for double crochet.
3.       Check out the size of the chest before working on the skirt
4.       Ch1 is not count

US Terms Abbreviation
c.           crochet
ch.         chain
sc.          single crochet
dc.         double crochet
slst.       slip stitch
st.          stitch
sts.        stitches
Rnd.       round
Rpt.        Repeat
Ch-sp.    Chain space
Skp.       Skip/miss

special stitch:
Shell :(2dc, ch1, 2dc)
V Stitch :(dc, ch2, dc)

pattern:


Start working from neck line.
Round1.     ch 49. dc in 4th ch. dc in each ch across, turn.(47)
Round2.    (inc)ch3, dc in next st, *2dc in next st, dc in next 3 sts*, rpt from * to* across, turn.

change colour.
Round3.    ch3, dc in next st, 1dc in each st across, turn.
Round4.    (inc)ch3, dc in next st, *2dc in next st, dc in next 2 sts*, rpt from * to* across, turn.

change colour.
Round5.    Repeat (Rnd 3)
Round6.    Repeat (Rnd 4)

change colour.
Round7.    Repeat (Rnd 3)
Round8.    Repeat (Rnd 4)

change colour.
Round9-10.  Repeat (Rnd 3)

Working in skirt.

change colour.
Round1.     ch1, sc in same st, *skp next st, shell(2dc,ch1,2dc) next st,skp next st, sc in next st*,
rpt from * to * across, turn.

divide for armhole.
stitch marker 7  shells for both armhole.

Round2.     ch3, *vst(dc,ch2,dc) into middle of shell, dc in next sc st*,rpt * to * 3 more time, 
work into next sc st, 2dc, ch2, skip 7 shells for armhole, work into next sc st, 2dc, rpt * to * 10
time for back side,  work into next sc st 2dc, ch2, skip 7 shells for 2nd armhole, work into next
sc st, 2dc, rpt * to * across to end.

change colour.
Round3.     ch1, sc in same st, *shell (2dc,ch1,2dc) in next middle of vst, sc in next dc st*, rpt 
from * to * 3 more time, under armhole in dc st, skp next dc, work shell into ch2-space,
skp next dc, sc in next dc st,rpt * to * 10 time for back side, under armhole in dc st, skp next
dc, work shell into ch2-space, skp next dc, sc in next dc st,rpt * to * across to end. turn.

Round4.    ch3, *vst(dc,ch2,dc) into middle of shell,dc in next sc st*,rpt from  * to * across to 
end. turn.

change colour.
Round5.     ch1, sc in same st, *shell (2dc,ch1,2dc) in next middle of vst, sc in next dc st*, rpt 
from * to * across to end.
Round7-15.  Repeat (Rnd 4, & Rnd 5).do and continue to the desire length. Fasten off

Sleeve x 2.

Round1.     use same color yarn into the sc st into armhole, ch3, *vst(dc,ch2,dc) into middle of 
shell,dc in next sc st*,rpt from  * to * around the armhole, dc in last sc st, slst to join in top of
3rd ch,turn.
Round2.     ch1, sc into dc st, *shell (2dc,ch1,2dc) in next middle of vst, sc in next dc st*, rpt 
from * to * around, slst to join in 1st sc. turn.
Round3.     ch3, *vst(dc,ch2,dc) into middle of shell,dc in next sc st*,rpt from  * to * across to 
around, slst in top of 3rd ch. turn.
Round4-6.   Repeat (Rnd 2, & Rnd 3).

change color.
Round7-8.   Repeat (Rnd 2, & Rnd 3).

change color.
Round9-10.   Repeat (Rnd 2, & Rnd 3).

change color.
Round11-12.   Repeat (Rnd 2, & Rnd 3). fasten off
weave ends and sew little hole under armhole.

Make front band.

Round1.    join yarn into corner of the right front, ch1, sc in same st, pick up 25 more sc in each 
st along the band, do 2sc into neck corner, do 1sc each st around the neck line, do 2sc in next
 neck corner, do 36 sc in each st along the left front band. turn.
Round2.     ch1, sc in same st, 1sc in each st across to neck corner, do 2sc into corner, do 1sc in 
each st around the neck line, do 2sc into next corner,ch1, skp next st for button hole, sc in
next 6 sts, do 2nd button hole, ch1, skp next st, do 1sc in next 6 sts, do 3rd button hole,ch1, 
skp next st, do 1sc in each st across to end. fasten off.

Finishing. weave all ends and sew 3 buttons on front band.
watch the free pattern for baby shoes


Friday, 31 August 2018

Crochet Lace tank Top Free Pattern


Today we share a new and stylish crochet top sweater tank .this crocheted sweater top sweet accessory for summer time for the small and cute girls. This adorable crochet design made in new and modern style for summer. We made many of the design for new born to other many sizes only share with you, my new ideas for those who want to knew and share for beginner crocheter want to learning and making things in home.
This Crochet pattern top share with the same video instruction. This cute and easy pullover wear for little girls are perfect them in both season spring and summer. Those simple adorable designs work up so quick and easy. To begin by watching the video on working sweater.

I give you easy instructions for this crocheted tank top sweater design for girls. Choose any of the color (light DK 100% acrylic) 3mm hook. For large size use larger hook and do more chains. We mention about the size on the screen. Every color is perfect for this tunic top. This easy idea you can use for large and more lager size. Only add more chains for larger sizes.

These beautiful and easy girl sweater top pattern crocheted for you special who want to learn in home or gifted to others. Hope you will be enjoy and write about me, like, share to friends and also share on your face book page and your pinterest. Thanks for watching and following.


Item to be need:
Palm color ( DK double knit Acrylic 100% yarn 4 ply (20 stitches = 4 inches)
Crochet hook size 3.00 mm

Size:   4-6 years

Gauge:  5 dc x 2.5 row = 1 inch
Pattern for gauge:  
Length top to down.18.5 inch
Chest .24 inch
Sleeve length under armhole to cuff. 8 inch

Special stitch:
1.       Do stitch marker 4 points for corner
2.       Ch3 as count for double crochet.
3.       Check out the size of the chest before working on the skirt
4.       Ch1 as count for single crochet

US Terms Abbreviation
c.           crochet
ch.         chain
sc.          single crochet
dc.         double crochet
slst.       slip stitch
st.          stitch
sts.        stitches
Rnd.       round
Rpt.          Repeat
Ch-sp.      Chain space
Skp.          Skip/miss

Written pattern:
Start from the neckline.
Ch 94, slst to join the ring. Be careful don’t twist the chain.
Round1.     Ch3 (as count), dc in each ch across to end, slst to join in top of 3rd ch. (94)
Divide stitches in 4 parts. (Back =27, 1st shoulder=20, front= 27, 2nd shoulder=20) do stitch marker
4 points for the corner.

Round2.     C4, skp next st, dc in next st, *ch1, skp next st, dc in next st*, rpt from * to*across to
next st marker st, make corner shell in next st(2dc,ch1,2dc), rpt * to * across into shoulder 20 sts,
make corner shell in next st(2dc,ch1,2dc), rpt * to * across into front 27 sts, make corner shell in
next st(2dc,ch1,2dc),Rpt * to * across into 2nd shoulder 20 sts, make corner shell in next st
(2dc,ch1, 2dc),rpt * to * across to end, slst to join into 3rd ch.

Round3.     Ch4, skp ch, dc in next dc st,*ch1, skp ch, dc in next dc st*, rpt from *to* across to next
Corner, ch1, dc into 1st st of the shell, make shell into middle of the previous shell, ch1, skp next
dc,dc in next st, rpt *to * across into 1st shoulder sts, ch1, dc into 1st st of the shell, make shell
into middle of the previous shell, ch1, skp next dc, dc in next st, Rpt *to* across into front sts,
ch1, dc into 1st st of the shell, make shell into middle of the previous shell, ch1, skp next dc,
dc in next st,rpt *to * across into 2nd shoulder sts, ch1, dc into 1st st of the shell, make shell
into middle of the previous shell, ch1, skp next dc, dc in next st, rpt * to * across to end,
slst to join into 3rd ch.

Round4-13.     Continue and Repeat (RND 3). OR as you want your desire chest size.
Stop increasing and join front to back.

Round14.     Ch1, sc in same st, sc next ch-sp,*sc in next st,sc in next ch-sp*, rpt from *to* across
 to next corner, sc in next 2 sts of the shell, sc in next ch-sp, leave the shoulder part, join front to
back and pick the next corner, sc in next middle ch-sp, sc in next 2 sts of the shell, rpt * to * across
to end.Slst to join in 1st sc.
Make the skirt.

Round1.     Ch1, sc in same st, *ch4, skp next 4 sts, sc in next st, ch5, skp next 4 sts, sc in next
st*,rpt from * to * across to end, slst to join in 1st sc, slst in next ch4 sp.

Round2.     Into ch-sp, ch3 (as count), 8 dc into same sp, *sc in next ch5-sp, shell 9dc in next 
ch4-sp*,rpt from *to * across to end, slst to join in top of 3rd ch, slst in next st.

Round3.     Ch4, dc in next st,[ch1, dc in next st, rpt 6 more time], skp last dc st dc st, *skp 1st
 dc st of the next shell, [ch1,dc rpt 7 time into next 7 sts], skp last dc st*, rpt from * to * across
to end, slst to join in 3rd ch, slst in next ch-sp.

Round4.     Sc in same sp, ch3, sc in next ch-sp, rpt 4 more time, *sc in next ch-sp, ch1*, 
rpt * to * 5 time in each shell across to end, slst to join in 1st sc, slst in next 3 ch, slst in next 
sc st, slst in next ch-sp.

Round5.    Sc in same sp, ch4, skp next ch3-sp, sc next ch3-sp,*ch5, skp last ch-sp, skp next
ch-sp of next shell, sc next ch-sp, ch4, skp next ch-sp, sc next ch-sp*, rpt from * to * across
to end, slst in 1st st.


Round6-32.     Continue and repeat (Rnd2, Rnd3, Rnd4, and Rnd5) OR as you want your desire length. Fasten off

Make sleeve 2.
Round1.     Join yarn into armhole 2nd st of the shell, ch4, *skp next st, dc in next dc st, ch1*, rpt
from * to *across to end, slst to join in 3rd ch.
Round2-15.   Ch4, *skp next st, dc in next st, ch1*, rpt from * to * across to end. Slst to join
in 3rd ch. Follow and continue 1 time fan stitch 4 rounds we done on the skirt. Fasten off

Finishing.   weave all ends.sew a little hole under armhole.