Friday, 18 December 2015

New Crochet Gloves


First I made a pair of finger less gloves for my nice. they look very stylish and completely different, in this pattern I used a very little complicated stitch, and it’s called a mesh stitch. It’s not a very difficult stitch to crocheting them, but the little difficult in this stitch to find a little hole, where you crocheting the double crochet stitch, but you don’t worry, there are many photos at the bottom designed to help you and guide you how to crochet the mesh stitch or simply a long dc stitch into the previous and 2 row down crochet it, I am sure you understand my explanation.

It’s a very thick and warm, its help you to warm your hand into the cold season. I love the solid colors for crocheting the finger less gloves for the adult size, you have to use any color of yarn for own choice.If you want to the small size of this project so you inform me to the email, I am truly helping you to crochet it.


I explain about it that you making the glove, to start the cuff part, in this tutorial I made a small cuff, if you want to make long cuff, you make a chain20 or 25 and then continue work to the same of this pattern, it is a little different to the right hand glove and the left to making the thumb space but all the work to the same in both gloves. I am sure that step by step picture tutorial help you the left hand glove. So take your crochet hook and make the gloves for your hand to save the cold.
My next project will be baby Cardigan with hat and small beautiful booties. I always try to help you new crocheting things with a new stitch. I like to crochet small things for my loving peoples, my relatives and for my own children’s.

Item to be need:
One color  pink worsted yarn 4ply
Special st:  Mesh Stitch 
Size: Adult size
Hook size. 3mm / US D 3.25mm

US Terms
ABBREVIATIONS:
c.         crochet
ch.       Chain
sc         single crochet
dc.       double crochet
sts.       Stitches
st.        stitch
slst.      Slip stitch
sks.      Skip stitch

PATTERN:


LEFT HAND GLOVE:

Make a cuff:


Row 1:     to start the cuff ch11, 1sc into the 2nd ch from the hook, 1sc into the next 9sts,
                turn. (10sc)


Row2:     (ch1 as count) 1sc (rib stitch) in each st across,(10sc) turn.(see th pic)


Row3:     (ch1 as count) 1sc in each st across, turn.(10sc)


Row4-30:    repeat (Row 2), (Row 3)turn. (10sc)


Note:    into the wrong side closed the wrist band, work slst into each st to join the two
parts together in wrong side, Don’t finish it, start work into the right side of the band.ch1,
and begin work along the row to the end, work 30 sc evenly around the band, slst to join
the 1st ch. (3osc)
Pattern rows:


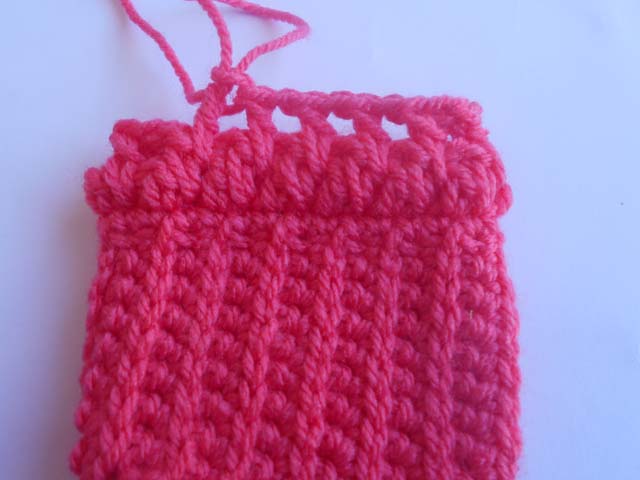
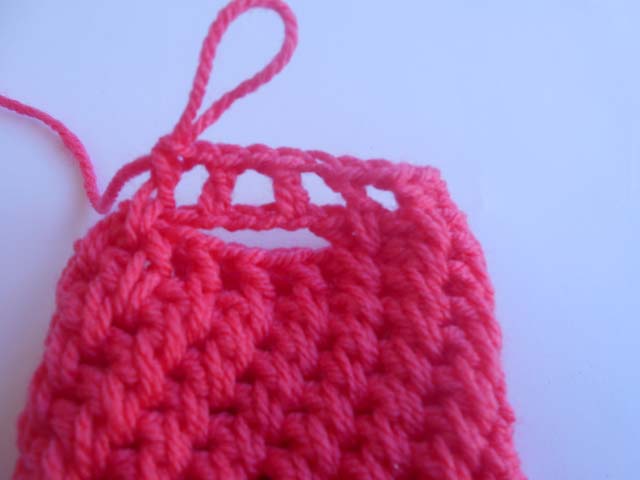
Row1:     ch1, skip st , 1dc into 1st st, repeat (dc, ch1, skip st , 1dc into next st) around,
               at the end of the row don’t ch1 after the last dc, slst to join.

Row2:     ch3, 1dc into the space to the left of dc, (two rows down or 2 step down)
               ch1, dc into next space , repeat to the end of the row don’t ch1 after
               the last dc, slst to join.


Note :   when starting  the next round find a little opening to the left of dc two rows down.
              (see the pic)

Row3:   ch3, dc into the space to the left of dc (two rows down or 2 step down) ch1 ,dc
             into next space, repeat ,to the end of the row, don’t ch1 after the last dc, slst to join.

Row 4- 13:   repeat (Row 3)

Make a thumb space:

Row14:     ch3, dc into the space to the left of dc (3 times or 3dc) make a thumb space ch5,
                 skip 4dc work, 1dc into the next 8spaces to the left of dc (two rows down or
                 2 step down) repeat, to the end of the row don’t ch1 after the last dc, slst to join.

Row15:     ch3, dc into the space to the left of dc (3 times), into the thumb space ch5
                 work ch1, skip a ch,1dc into next ch, repeat (3 times) continue work,
                 1dc into the space to the left of dc (two rows down or2 step down) repeat,
                  to the end of the row don’t ch1 after the last dc, slst to join.

Row16-17:    repeat (Row 2)
Row18:         ch3, 1sc into the space to the left of dc, (two rows down or 2 step down)
                    1sc into the skip ch into the previous row, sc into next space , repeat to the
                    end of the row don’t ch1 after the last sc, slst to join. Fasten off.
                  
           
                     Cut the yarn and weave in end

Right hand glove:
Make a cuff:  
Follow the left hand pattern to the same.
Pattern rows:   
Row 1- 13:   follow the left hand pattern to the same.
Make a thumb space:
Row14:        ch3, dc into the space to the left of dc (two rows down or 2 step down)
                    (10 times or 10dc)  make a thumb space ch5, skip 4dc Work, 1dc into
                    the last space, repeat, to the end of the row don’t ch1 after the last dc,
                    slst to join.
Row15-17:   repeat (Row 15, 16, 17) follows the left hand pattern to the same.
Row18:        repeat (Row18 ) follows the left hand pattern to the same.Fasten off.

you may also like


Sunday, 29 November 2015

Crochet Baby Sweater 0 -3 months Free Pattern


This adorable crochet baby sweater for 0–3 months is the perfect handmade piece to keep little ones warm, cozy, and stylish. Made with soft and gentle baby-friendly yarn, it ensures comfort for delicate skin while offering a beautiful handmade charm. The sweater features a snug yet breathable design, making it suitable for everyday wear, special occasions, or as a thoughtful baby shower gift. Its lightweight feel makes it perfect for layering during cool mornings, evenings, or winter days.

The design includes a comfortable neckline for easy dressing, long sleeves to keep tiny arms warm, and a stretchable fit that allows freedom of movement. The front opening, often with buttons or ties, makes it convenient for quick changes without causing discomfort to the baby. Each stitch adds to its durability, ensuring it can be passed down as a keepsake or treasured memory.

The sweater can be made in neutral colors for a classic look or in pastel shades like pink, blue, mint, or cream for a soft baby touch. Decorative elements like little crochet flowers, ribbons, or edging can be added for extra cuteness. It’s lightweight yet warm, making it an ideal garment for newborns up to three months. This crochet baby sweater combines practicality, warmth, and handmade beauty, making it a must-have for every newborn wardrobe.

hope you will love more designs for Babies and toddlers for boys and girls like , Baby SneakersBaby clothsBaby Hooded jackets, Baby Shoes and more for Adult Shoesclick on the links to get baby free patterns write about me, like, share to friends and also share on your Facebook page. on Pinterest. Thanks for watching to visit here.

Facebook page. on Pinterest. Thanks for watching to visit here.
For more design watch Jasmine flowers and Roses Gajray  video tutorial. 
Rose Bouquet Blanket video tutorial
Follow my you tube channel 
Follow us my Pinterest
Follow us my page Facebook 
Follow my YouTube channel (crochet-crosia)
Follow my you tube channel English (crochet-crosia) 
Follow Home Decors (Diy crochet-crosia)


✨ Features:

  • Handcrafted with love using soft, baby-friendly yarn

  • Warm and breathable – ideal for autumn and winter

  • Adorable button-up front for easy dressing

  • Available in multiple sizes (0-3 months, 3-6 months, etc.)

Items to be need:

Wool: 150 Grams Baby Pink & white colors #3 Light Weight yarn /DK weight 3 Ply

which is  (5 double crochet = 1 inch with hook size 3mm/D-3 OR Size no/11)

Hook size: 3mm (D-3)/ OR Size no/11

Baby Cardigan Size:   0-3 Months, follow size chart bellow for more sizes.

Pattern Gauge:  5 double crochet stitches x 2.5 Rows = 1 inch with Hook size 3mm (D-3)


Baby Sweater complete measurement 0-3 months:

Length from top to bottom: 13 inches/33 cm

Chest size: 21 inches/52-53 cm

Sleeve length from under arm to cuffs: 6 inches/15 cm


US Terms ABBREVIATIONS:

c.          Crochet
ch.        Chain
sc         Single crochet
hdc       Half double crochet
dc.        Double crochet
sts.       Stitches
st.         Stitch
sl st.      Slip stitches
sc tog    Single crochet 2 together
dc tog    Double crochet 2 together
FP dc     Front post double crochet
Bp dc     Back post double crochet


Sweater Pattern 0-3 months:

Starting Work yellow color yarn:
Row1:              ch62, 1hdc into 3rd ch, 1hdc in each ch across, turn. (60hdc)
                        Divide the sts into 5 parts (10+10+20+10+10)
Row 2: 
1st part:          (ch1 as count) 1hdc into 8sts, increase (1hdc, ch1, 1hdc) into the 10st,
2nd part:          1hdc into next of the 9sts, increase (1hdc, ch1, 1hdc) into the 10st,
3rd part:           1hdc into next of the 19sts, increase (1hdc, ch1, 1hdc) into the 20st,
 4th part:          1hdc into next of the 9sts, increase (1hdc, ch1, 1hdc) into the 10st,
 5th part:          1hdc into the last 10sts, turn.
Row3:             
1st part: (INC) (ch1 as count) 1hdc into 10sts (increase into the space of the
Previous rnd increase (1hdc, ch1, 1hdc))
2nd part:           1hdc into 10sts [increase into the space of the previous row
Increase (1hdc, ch1, 1hdc)]
3rd part:           1hdc into 20sts [increase into the space of the previous Row
Increase (1hdc, ch1, 1hdc)]
4th part:           1hdc into 10sts [increase into the space of the previous Row
 Increase (1hdc, ch1, 1hdc)]
5th part:           1hdc into the last 9sts,turn.
Row 4-7:           Repeat (INC Row 3)
Row 8:              Repeat (Row 3) at the end slip st to join ch1, turn.
Row 9-19:         Repeat (Row 8)
Note:    total sts 132= front part (38sts), back part (38sts), first arm part (28sts),
              2nd arm part (28sts)
Change color pink
Row20:           to start into the front right side corner 1dc in each of the 38sts,
skip the 28sts 1st arm part,1dc in each of the next 38sts,
skip the 28sts 2nd arm part ,slst to join into the beginning ch.(76sts)
Row21:           1dc in each st around. slip st. (76)
Change color yellow
Row22-30:        1dc in each st around. slip st. (76)
Change color pink
Row31-33:         1sc in each st around. slip st. (76). Fasten off weave ends


Make sleeves:
Work pink color yarn:
Row1-2:            join into underarm, ch3 count, 1dc in each st around armhole. slip st. (28 dc)
Change color yellow
Row3-8:            ch3 count, 1dc in each st around. slip st. (28 dc)
Row9-10:          1sc in each st around. slip st. (28 dc). fasten off
Finishing:  make the edges of the neck line, 1sc in each st around the neck and the button space, make the button hole ch5, continue work 1sc, at the end slst.Sew the same color button into the right place, 
fasten off. 


Hat Pattern:
Color yellow:
Make a magic ring.
Row1:             (ch1 as count) 7hdc into the magic ring, slip st, turn (8hdc)
Row2:            (ch1 as count) *1hdc into the same st, 2hdc into the next st,
  Repeat from*, slip st, turn. (16hdc)
Row3:             (ch1 as count) 2hdc into the next st, repeat *(1hdc, 2hdc next st)
   around, slip st, turn. (24hdc)
Row4:             (ch1 as count) 1hdc into the next st , 2hdc into next st,
   repeat *(1hdc into 2sts, 2hdc next st) around, slip st, turn. (32hdc)
Row5:              (ch1 as count) 1hdc into the next 2sts, 2hdc into next st,
  repeat *(1hdc into 3sts, 2hdc next st) around, slip st, turn. (40hdc)
Row6:             (ch1 as count) 1hdc into the next 3sts, 2hdc into next st,
  repeat *(1hdc into 4sts, 2hdc next st) around, slip st, turn. (48hdc)

Row7:               (ch1 as count) 1hdc into the next 4sts, 2hdc into next st,
 repeat (1hdc into 5sts, 2hdc, 2hdc into next st)
around, slst, turn. (56hdc)
Row8-10:          (ch1 as count) turn, 1hdc in each st around, slst (56)
Color pink:
Row11-12:        (ch2 as count) 1dc in each st around, slst (56)
Color yellow:
Row13-15:        repeat  (rnd 11)
Row16:             1sc in each st around, slst (56)


Flower Pattern:
Color pink:
Row1:               into the magic ring ch4, 1dc, ch1, 1dc total (7 times)
Color yellow:
Row2:               work into the first petal space (1sc, ch1, 4dc, ch1, 1sc) repeat (7 spaces)
Color pink:
Row3:               ch1, 1sc (5 times) in each petal sts, slst into the middle of the 2 petals,
    repeat (work into 7 petals sts)
Finishing:         with the crochet needle sew the flower on the hat. Fasten off