Friday 31 August 2018

Crochet Lace tank Top Free Pattern


Today we share a new and stylish crochet top sweater tank .this crocheted sweater top sweet accessory 
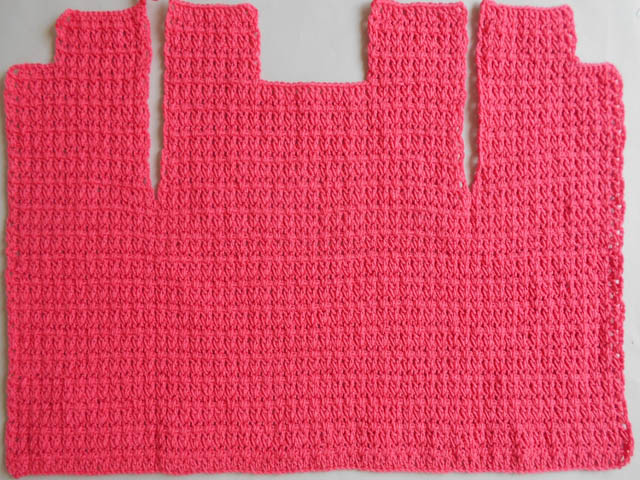
for summer time for the small and cute girls. This adorable crochet design made in new and modern style for summer. We made many of the design for new born to other many sizes only share with you, my new ideas for those who want to knew and share for beginner crocheter want to learning and making things in home.
This Crochet pattern top share with the same video instruction. This cute and easy pullover wear for little girls are perfect them in both season spring and summer. Those simple adorable designs work up so quick and easy. To begin by watching the video on working sweater.

I give you easy instructions for this crocheted tank top sweater design for girls. Choose any of the color (light DK 100% acrylic) 3mm hook. For large size use larger hook and do more chains. We mention about the size on the screen. Every color is perfect for this tunic top. This easy idea you can use for large and more lager size. Only add more chains for larger sizes.

These beautiful and easy girl sweater top pattern crocheted for you special who want to learn in home or gifted to others. Hope you will be enjoy and write about me, like, share to friends and also share on your face book page and your pinterest. Thanks for watching and following.


Item to be need:
Palm color ( DK double knit Acrylic 100% yarn 4 ply (20 stitches = 4 inches)
Crochet hook size 3.00 mm

Size:   4-6 years

Gauge:  5 dc x 2.5 row = 1 inch
Pattern for gauge:  
Length top to down.18.5 inch
Chest .24 inch
Sleeve length under armhole to cuff. 8 inch

Special stitch:
1.       Do stitch marker 4 points for corner
2.       Ch3 as count for double crochet.
3.       Check out the size of the chest before working on the skirt
4.       Ch1 as count for single crochet

US Terms Abbreviation
c.           crochet
ch.         chain
sc.          single crochet
dc.         double crochet
slst.       slip stitch
st.          stitch
sts.        stitches
Rnd.       round
Rpt.          Repeat
Ch-sp.      Chain space
Skp.          Skip/miss

Written pattern:
Start from the neckline.
Ch 94, slst to join the ring. Be careful don’t twist the chain.
Round1.     Ch3 (as count), dc in each ch across to end, slst to join in top of 3rd ch. (94)
Divide stitches in 4 parts. (Back =27, 1st shoulder=20, front= 27, 2nd shoulder=20) do stitch marker
4 points for the corner.

Round2.     C4, skp next st, dc in next st, *ch1, skp next st, dc in next st*, rpt from * to*across to
next st marker st, make corner shell in next st(2dc,ch1,2dc), rpt * to * across into shoulder 20 sts,
make corner shell in next st(2dc,ch1,2dc), rpt * to * across into front 27 sts, make corner shell in
next st(2dc,ch1,2dc),Rpt * to * across into 2nd shoulder 20 sts, make corner shell in next st
(2dc,ch1, 2dc),rpt * to * across to end, slst to join into 3rd ch.

Round3.     Ch4, skp ch, dc in next dc st,*ch1, skp ch, dc in next dc st*, rpt from *to* across to next
Corner, ch1, dc into 1st st of the shell, make shell into middle of the previous shell, ch1, skp next
dc,dc in next st, rpt *to * across into 1st shoulder sts, ch1, dc into 1st st of the shell, make shell
into middle of the previous shell, ch1, skp next dc, dc in next st, Rpt *to* across into front sts,
ch1, dc into 1st st of the shell, make shell into middle of the previous shell, ch1, skp next dc,
dc in next st,rpt *to * across into 2nd shoulder sts, ch1, dc into 1st st of the shell, make shell
into middle of the previous shell, ch1, skp next dc, dc in next st, rpt * to * across to end,
slst to join into 3rd ch.

Round4-13.     Continue and Repeat (RND 3). OR as you want your desire chest size.
Stop increasing and join front to back.

Round14.     Ch1, sc in same st, sc next ch-sp,*sc in next st,sc in next ch-sp*, rpt from *to* across
 to next corner, sc in next 2 sts of the shell, sc in next ch-sp, leave the shoulder part, join front to
back and pick the next corner, sc in next middle ch-sp, sc in next 2 sts of the shell, rpt * to * across
to end.Slst to join in 1st sc.
Make the skirt.

Round1.     Ch1, sc in same st, *ch4, skp next 4 sts, sc in next st, ch5, skp next 4 sts, sc in next
st*,rpt from * to * across to end, slst to join in 1st sc, slst in next ch4 sp.

Round2.     Into ch-sp, ch3 (as count), 8 dc into same sp, *sc in next ch5-sp, shell 9dc in next 
ch4-sp*,rpt from *to * across to end, slst to join in top of 3rd ch, slst in next st.

Round3.     Ch4, dc in next st,[ch1, dc in next st, rpt 6 more time], skp last dc st dc st, *skp 1st
 dc st of the next shell, [ch1,dc rpt 7 time into next 7 sts], skp last dc st*, rpt from * to * across
to end, slst to join in 3rd ch, slst in next ch-sp.

Round4.     Sc in same sp, ch3, sc in next ch-sp, rpt 4 more time, *sc in next ch-sp, ch1*, 
rpt * to * 5 time in each shell across to end, slst to join in 1st sc, slst in next 3 ch, slst in next 
sc st, slst in next ch-sp.

Round5.    Sc in same sp, ch4, skp next ch3-sp, sc next ch3-sp,*ch5, skp last ch-sp, skp next
ch-sp of next shell, sc next ch-sp, ch4, skp next ch-sp, sc next ch-sp*, rpt from * to * across
to end, slst in 1st st.


Round6-32.     Continue and repeat (Rnd2, Rnd3, Rnd4, and Rnd5) OR as you want your desire length. Fasten off

Make sleeve 2.
Round1.     Join yarn into armhole 2nd st of the shell, ch4, *skp next st, dc in next dc st, ch1*, rpt
from * to *across to end, slst to join in 3rd ch.
Round2-15.   Ch4, *skp next st, dc in next st, ch1*, rpt from * to * across to end. Slst to join
in 3rd ch. Follow and continue 1 time fan stitch 4 rounds we done on the skirt. Fasten off

Finishing.   weave all ends.sew a little hole under armhole.

Crochet Beaded Booties Little Girls


Today I shared your favorite baby beaded booties for girls. This adorable design created only for small baby girls to protect her feet in winter season. This lovely design created for cute babies when she walks around in the home, and fined activities, I like them very much. It’s made in simple design for special new crocheters and for those who making first time the baby booties.
I am glad to see all my followers they appreciated my previous baby design all the time. So, I tried another simple and easy way for them. I made this for 6-12 months babies. I hope you will be enjoy this great idea for the babies.

Instructions:  These lovely and beautiful shoes made for 6-12 months babies. It’s created with a simple idea only for you. We made 2 soles for each shoe. Then work around with a simple and easy double crochet stitch. Before working stitch marker the points and working on front, after completing all the work then join 2 soles together. sew beads around. We made the same video in Urdu. For the ribbon bow watch my channel (handmade craft).
The written pattern is very easy; I shared the same video tutorial, watch the video and weave your ideas. Hope you will be enjoy.

Item to be need:
Yellow color baby DK weight yarn (4ply)
Crochet hook size 3.00 mm
Small buttons
Crochet needle
Golden color small beads
Ribbon bow
Lace for button strap
glue

Size:   6-12 month’s baby
Gauge:  5 dc x 2 row = 1 inch
Pattern for gauge:  
Length of sole =5 inches

Special stitch:
1.       Count stitches and do stitch marker on the same place.
2.       Ch3 count for double crochet.
3.       Check out size of the sole before top working.
4.       make 2 soles for each shoe.

US Terms Abbreviation
c.           Crochet
ch.         Chain
sc.          Single crochet
dc.         Double crochet
slst.       Slip stitch
st.          Stitch
sts.        Stitches
Rnd.      Round
Skp.      Skip/miss
Rpt.          Repeat
Dc tog.     Double crochet two together


Pattern:
Sole:
Round1:     ch16, 2dc in 4th ch form the hook, dc in next 11 ch,s, 6dc in last ch,
work in opposite side,
                     dc in each 11sts, 3dc in last st, slst to join in top of 3rd ch. (34)
Round2:     ch3, dc in same st, 2dc in next 2 sts, dc in each 11 sts, 2dc in each 6dc group,
work in opposite side,
                    dc in each 11 sts, 2dc in each last 3 sts, slst to join in top of 3rd ch. (46)
Round3:    ch3, 2dc in next st, (1dc, 2dc) rpt 2 more times in next sts, dc in each 11 sts,
                  (1dc, 2dc) Rpt 6 times in next 12 sts,
Work in opposite side,
dc in each 11 sts, (1dc, 2dc) rpt 3 times in next sts, slst to join in top of 3rd ch. (58)

Note:   make 3 more sole to the same.

Start Upper part of the booties.
Round4:     ch3, dc into BL in each st around, slst to join in top of 3rd ch. (58)
Round5:     ch3, dc in each st around, slst to join in top of 3rd ch. (58)

Dived sts in 3 parts, stitch marker (15+15 for both sides, 28 sts for the front) 

Round6:     ch3, dc in each 15 sts across, dc tog Rpt 14 times in front 28 sts, dc in each 14 sts
                    across to end, slst to join in top of 3rd ch. (44)
Round7:     ch3, dc in each 15 sts across, dc tog Rpt 7 times in front 14 sts, dc in each 14 sts
                    across to end, slst to join in top of 3rd ch. (37)

Make button strap for right shoe:
Count and do stitch marker 19 sts for the back side.
Round8:     join yarn into st marker, ch2, dc in same st, dc in each 18 sts across. (19)
Round9:     make ch 18 for button strap, dc in 4th ch from the hook, dc in each ch across,
                  dc in each 19 sts across to end, slst.

Make button strap for left shoe:
Round8:    join yarn into st marker, ch2, dc in same st, dc in each 18 sts across, turn. (19)
Round9:    ch2, dc in same st, dc in each 18 sts across, make ch 18 for button strap, dc in
                  4ch form the hook, dc in each ch across to end, slst into the base of ch2. Fasten off
Finishing:   
1.       Attach the 2nd soles together, use a crab/ reverse single crochet stitch for sewing.
2.       Sew beads around the sole into the beginning round, use needle and same color thread
 for sewing.
3.       Cut a piece of lace for the strap, and attach with a glue. Sew small button in the other side.
Note:    Make a ribbon bow then sew or glue at front of the shoe.(Watch my craft tutorial)

Friday 17 August 2018

CROCHET TUTORIAL: Baby Flip Flops Sandals


Today we are going to share a new and stylish crochet baby beaded flip flop sandals .this shoes crocheted for babies are sweet accessory for your summer time. This adorable crochet baby beads sandals made in new and modern style for summer to protect and look pretty on babies’ feet. We made many of the baby sandals design for new born to other many sizes only share with you, and for share my new ideas who’s  want to learn and also share for beginner crocheter for learning and making things in home for the babies. 


These Crochet pattern baby flip flops sandals made and share with the same video instruction. This cute and easy footwear for baby girls are perfect them in both season spring and summer. Those simple adorable designs work up so quickly and easy. To begin by watching the video on working and join both sole.
These beautiful baby crochet sandals are such fun to make with the same video. The pattern made in one size for 0-3 months. These pairs baby beaded crochet sandals will looks beautiful on little feet and make more stylish her personality.try and make for the little ones. Cool and airy for the summer with protection for little toes. We love and share free pattern for summer.


We always give easy instructions. Crochet baby beaded sandals only for 0-3 months’ choose any of two color (light baby DK 100% acrylic) and use the same beads for these baby sandals pattern. I think every color is perfect match for these small items.
those beautiful and easy baby flip flops sandals pattern crocheted for the small and cute princess. Hope you will be enjoy and also write about me, like, share to friends and also share on your facbook page and share on pinterest . Thanks for watching and following.


Item to be need:
Two colors of yarn: white and pink colors (baby DK double knit Acrylic yarn 4 ply (20 stitches = 4 inches)
Crochet hook size 3.00 mm
Size:   0-3 month’s baby
Gauge:  5 dc x 2.5 row = 1 inch
Pattern for gauge:  
Length of sole=3.5 inches
Special stitch:
1.       Do stitch marker on the side stitches.
2.       Check out the size of the sole before top part working.
3.       Ch1 as count for single crochet.
4.       Ch3 as count for dc

US Terms Abbreviation
c.           crochet
ch.         chain
sc.          single crochet
hdc.       Half double crochet
dc.         double crochet
slst.       slip stitch
st.          stitch
sts.        stitches
Rnd.       round
Rpt.          Repeat

Pattern:
To start working from the sole:
Round1:     ch11, 2dc in 4th ch from the hook, dc in next 6 ch,s, 6dc in last ch,
Work in opposite side:
                     dc in next  6sts, 3dc in last st, slst to join in 1st dc. (24)
Round2:     ch3, dc in same st, 2dc in next 2 sts, dc in next 6 sts, 2dc in each st into 6 sts group,
Work in opposite side:
                     dc in next 6 sts, 2dc in each st into last 3sts group, slst to join in 1st dc. (36)
Round3:     ch1, sc in same st, 2sc in next st, (1sc, 2sc) rpt 2 times in next 4 sts, sc in next 2sts,
                     hdc in next 2 sts, dc in next 2 sts, (2dc, 1dc)rpt 6 times  in each next 12 sts,
Work in opposite side:
                     dc in next 2 sts, hdc in next 2 sts, sc in next 2sts,(2sc, 1sc) rpt 3 times in each next
                     6 sts, slst to join in 1st sc. (48). Fasten off
Note:   Make 3 more soles to the same pattern.
Join two soles together:
Sewing:   sew 2 soles together right side facing out, use color B for sewing, do a slst in each st around the sole. Fasten off

Make side flap parts.
Work.  Leave 18 stitches for back side on heel; do stitch marker 5 stitches for both side flaps.
Working  in top sole stitches, as we showing in video.

Work on right side flap.
*Row1.     Join yarn, ch1, sc in same st, sc in next 4 sts, turn. (5)
Row2-3.     Ch1 (as count), sc in each next 4 sts, turn. (5)*
Fasten off

Work on left side flap.
Follow and repeat from * to *same work as we done on right side flap, don’t fasten off and start working for front flaps.
Row 4.    At the end of row 3 make 8 ch,s , do dc into middle st at front of the sole, make 
                again 8 ch,s,
                Do 1sc in each st across into side flap 5sts, make 10 ch,s for back side, do 1sc in each 
                st across into side flap 5 sts. Don’t turn continue next round.
Row5.     Do 1sc in each 8 ch,s, do 1sc into dc st, do 1sc each next 8 ch,s, do 1sc in each next
                5 sts on side flap, do 1sc in each 10 ch,s back side, do 1sc n each side flap sts. Fasten off

Finishing.  Sew some of same colors plastic beads on the front flap. Make one small flower and sew beads into middle of the flower, then sew on the sandal.


Make flower:
Row1.     Ch4, slst to join in 1st  ch, make a ring.
Row2.     ch3 (as count) dc into ring,*ch2, 2dc* repeat from *to * 5 time, do slst in 3rd ch. (6 ch spaces)
Row3.     Slst into 1st ch 2 sp,* make 5dc into ch sp, 1sc into next middle of 2dc*, rpt from * to *
                6 times.  Fasten off

Friday 3 August 2018

Crochet Lacy Baby Frock Dress Tutorial


hello! today we going to share new and different baby ruffle dress free pattern. this size made for 2 years baby girls. we used dk acrylic 100% wool and 3mm hook.
hope you will be like and share this free video tutorial.


pattern: