Wednesday 28 September 2022

Crochet Button Band Sweater// New Deign Pullover Round Neck Buttoned Sweater


Hello every one! Today topic is crochet pullover designs Buttoned sweater. This adorable, most elegant stylish sweater New Creation most popular Sweater Design made for kids and boys and girls. you can make it in different colors according to your choice larger or smaller we explain below in my pattern. i made the button band sweater for infant baby 9-18 months size, we mentions and explain in details below for all sizes and also explain for you easy to understand share the same pattern in my

Newest Pattern for Baby Buttoned Romper.

i love to make the sweater in new design at front panel embellished buttons. It's a very special gift for cute and lovely kids to protect him/her form chilly season. We love and crochet baby items in the whole of the years and also shared in my own blog you always come here and watch my tutorial I am glad to see that you appreciated my designs and follow my work. thanks to follow me and thanks to all to share my free patterns to friend and other social media to expand my work.
love to make Baby Patterns, like Baby Rompers, Baby Shoes, Baby Collar Jackets, and share more for Boys and Girls Fashion accessories.

love the pullover sweater design and also the colors. i hope you will like and appreciate, write about me, like, share to friends and also share on your Facebook page. on Pinterest. Thanks for watching to visit here.

If you have any problem to understand the pattern, so, please share with me at the comment, I will help as soon as possible. For more help watch the video tutorial. Follow my YouTube channel for more beautiful 

Instructions:  We made new stylish crochet buttoned sweater With a Baby Beanie Hat for 9-18 months size, you can easily to change the size as you want to make it, we explain in details about the sizes i my pattern and video tutorial below.. We add two of the colors in this button band sweater and Baby Beanie hat, you can chose any of other colors according to your taste. We used DK weight wool 4ply with 5mm(H) crochet hook for this baby sweater and baby beanie hat. Size of the sweater we mention below in the pattern. This baby elegant sweater started from neckline to bottom, we add simple stitch for the pattern, it’s very easy to start, we mention below about all sizes,  if you need a smaller or larger sizes, next Project will come another super baby patterns. so, you can follow my other crochet ideas we mention below. We add a beautiful super easy my favorite pattern at front, explain in details hope you will like it.

All my free crochet pattern originally share in my web page share video tutorial on my YouTube channel(crochet-crosai) . Hope you will be enjoys my new ideas with simple pattern and shares the same videos too.
Baby Lace Up Shoes/Booties:

for more beautiful crochet videos watch in my you tube channel

changing for Sizes:

0-3 Months: Rib Band Size: 36 Rounds of single crochet = 9 inches/23 cm

3-6 Months: Rib Band Size: 38 Rounds of single crochet = 9 and 1/2 inches/24cm

(make 5 inches from shoulder then divide sleeves)

9-18 Months: Rib Band Size:40 Rounds of single crochet = 10 inches/26cm

(make 5 and 1/2 inches from shoulder then divide sleeves) 

Toddler & Small Child : 

1- Child (Approximately 3-5 years - 
Rib Band Size: 44 Rounds of single crochet = 11 inches/28cm

(make 6 inches from shoulder then divide sleeves) 

2- Approximately 6-8 years: Rib Band Size: 48 Rounds of single crochet = 12 inches/31cm

(make 7 inches from shoulder then divide sleeves) 

For more help watch the (video tutorial)

  Download instructions at the top of the page. 

Item to be need:

wool: 240 Grams DK Weight Acrylic 4 ply yarn (16-20 = 4 inches)

Crochet hook size:  5mm(H) 

Buttons

 Size:      9-18 months Infant Baby

Gauge:  4 stitches x 4 rows = 1 inch

 Pattern for gauge:  

Length from shoulder to bottom Band: 14 inches/36 cm 

chest measurement for sweater: 23 inches


 Special stitch:

1.     1-Check out the size of beginning Rib band and chest measurement then divide for sleeves.


           US Terms Abbreviation

·         Ch   chains

·         st     stitch

·         Sc    single crochet

·         Hdc  half double crochet

·         Dc    double crochet

·         trb    treble crochet

·         Sts    Stitches

·         Sl st   slip stitch

           Bl      Back loop

           FP      Front Post  

           BP      Back Post

Start Neck Line Band:

Color B:

Make chains 7,

Round1- sc into 2nd ch from the hook, make 1 sc in each ch across, turn work.(6sc)

Round2- ch1, make 1 sc into back loop in each 6 sts across, turn work.(6sc)

Round3-40: Repeat and follow the same work as we done in Rib band Round 2.

Measurement Approx.: 40 Rounds = 10 inches/26cm

Now working into band edging:

Round1- ch1, make 1 sc in each st into Rib band across to end, turn work.(41 sc)

Round2- ch1, make 1sc into same st back loop, then make 1 sc into back loop in each

St across to end, turn work.(41 sc)

Dived stitches and stitch marked for front, back and sleeves.

Work: leave 4 sts for button band, mark next st, leave 5 sts for 1st shoulder, mark next st,

Leave next 9 sts back side, mark next st, leave 5 sts for 2nd shoulder, mark next st, Leave next

9 sts Front side, mark next st,at the end leave 4 sts for button band.

Change color A:

Round3- ch1 not count,(Button Band) make sc into back loop same st, make 1 sc into back loop

 in each Next 3 sts,  make 2 sc into next marked st, make 1 sc in each next 5 sts(shoulder), make

3 sc into next marked st, make 1 sc in each next 9 sts (Back), make 3 sc into next marked st,

Make 1 sc in each next 5 sts(2nd shoulder), make 3 sc into next marked st, make 1 sc in each

Next 9 sts(Front), make 2 sc into next marked st, then make 1 sc in each back loop for  button band,

turn work.

Round4- ch1 not count,(button Band), make 1 sc into back loop same st, make 1 sc into back

Loop next 3 sts, make 2 sc into next marked st, make 1 sc in each next 11 sts(Front), make 3 sc into

Marked middle st of previous Round corner 3 sts, make 1 sc in each next 7 sts(1st shoulder), make

 3 sc into Marked middle st of previous Round corner 3 sts, make 1 sc in each next 11 sts(Back),

Make 3 sc into marked middle st of previous Round corner 3 sts, make 1 sc in each next 7 sts

(2nd shoulder), make 2 sc into next marked st, , then make 1 sc in each 4 sts back loop for button

band, turn work.

Round5- 12: Repeat and Follow the same work as we done in Round 4 for pattern of chest.

Change color B:

Round13-14: Repeat and Follow the same work as we done in Round 4 for pattern of chest.

Change color A:

Round15-17: Repeat and Follow the same work as we done in Round 4 for pattern of chest.

Measurement Approx from Shoulder: 17 Rounds = 5 inches/13 cm

Change color B:

Round18: ch1 not count,(button Band), make 1 sc into back loop same st, make 1 sc into back

Loop next 3 sts, make 2 sc into next marked st, make 1 sc in each st from corner to corner(Front),

Make 3 sc into next middle marked st of previous Round corner st,

make 1 sc in each st from corner to corner(1st shoulder) ,Make 3 sc into next middle marked st

 of previous Round corner st, make 1 sc in each st from corner to corner(Back) ,Make 3 sc into

 next middle marked st of previous Round corner st, make 1 sc in each st from corner to corner

(2nd shoulder), make 2 sc into next marked st, , then make 1 sc in each 4 sts back loop for button

 band, turn work.

 Measurement Approx. from Shoulder: 18Rounds = 5 and ½ inches/14 cm

Now next Round 19 divide sleeves section.

Round19: ch1 not count,(button Band), make 1 sc into back loop same st, make 1 sc into back

Loop next 3 sts, make 1 sc into next marked st, leave/skip 1st sleeve stitches, make 1 sc into next

Middle st of corner, then make 1 sc in each next  43 sts across from corner to corner back side

across, leave/skip 2nd sleeve stitches, then make 1 sc into next middle st of corner, then make 1 sc

in each next 43 sts across from corner to corner Front, , then make 1 sc in each back loop for button

band, turn work.

Round20: not count,(button Band), make 1 sc into back loop same st, make 1 sc into back

Loop next 3 sts, then continue make 1 sc in each st across front and back side sts, at the end make

1 sc in each 4 sts back loop for button band, turn work.

Round21-24: Repeat and Follow the same work as we done Sweater Round 20.

Change color A:

Round 25-32:  Repeat and Follow the same work as we done Sweater Round 20.

Change color B:

Round 33-34:  Repeat and Follow the same work as we done Sweater Round 20.

Change color A:

Round 35-40:  Repeat and Follow the same work as we done Sweater Round 20.

Change color B:

Round 41-48:  Repeat and Follow the same work as we done Sweater Round 20.fasten off

Measurement Approx. from division of sleeves: 8 inches/20cm

Make Border Band:

 Row 1- ch1, make 1 sc into back loop 4 sts, turn work.(4sc)

Row2-5: ch1, make 1 sc into back loop 4 sts, now working into edg of rib 5 row sts,

Round1 of band: ch1, make 1 sc in each 5 sts of rib 5 rows, make slip st in each next

2 sts of Round 48, then turn work.(5sc)

Round2, skip next 2 slip sts, then make 1 sc into back loop next 5 sts, turn work.(5 sc)

Round3- ch1, make 1 sc into back loop next 5 sts, make slip st in each next 2 sts of Round48,

Turn work.(5sc)

Form Round 4 Repeat and follow the same work as we done in Round 2 and Round3 of

Border band.

At the end of 5 sts of round 48, work, make 1 slip st into next st of round 48 , make 1 sc into

Back loop next 4 sts of band, turn work.(4 sc)

Row 2-5: ch1, sc into back loop 4 sts, turn work.(4sc)

Sewing: cut the yarn, sew the band to close. Fasten off (watch video tutorial)

Make Sleeves:

Change color B:

Round1: join yarn into next st of sleeve corner, ch1, make 1 sc in each next 36 sts around

Sleeve opening, do slip st to join into ch1, turn work. (36 sc+ch1)

Round2-4: ch1, make 1 sc in each st around the sleeves opening, do slip st to join into

Ch1, turn work.(36 sc+ch1)

Change color A:

Round5: ch1, make 1 sc in each next 34 sts around, at the end make 2 sc together, do slip st

To join into ch1, turn work. (35 sc+ch1)

Round6: ch1, make 1 sc in each next 33 sts around, at the end make 2 sc together, do slip st

To join into ch1, turn work. (34 sc+ch1)

Round7: ch1, make 1 sc in each next 32 sts around, at the end make 2 sc together, do slip st

To join into ch1, turn work. (33 sc+ch1)

Round8: ch1, make 1 sc in each next 31 sts around, at the end make 2 sc together, do slip st

To join into ch1, turn work. (32 sc+ch1)

Round9: ch1, make 1 sc in each next 30 sts around, at the end make 2 sc together, do slip st

To join into ch1, turn work. (31 sc+ch1)

Round10: ch1, make 1 sc in each next 29 sts around, at the end make 2 sc together, do slip st

To join into ch1, turn work. (30 sc+ch1)

Round11: ch1, make 1 sc in each next 28 sts around, at the end make 2 sc together, do slip st

To join into ch1, turn work. (29 sc+ch1)

Round12: ch1, make 1 sc in each next 27 sts around, at the end make 2 sc together, do slip st

To join into ch1, turn work. (28 sc+ch1)

Change color B:

Round13-14: Repeat and follow the same work Round 12 of sleeve.

Change color A:

Round15-20: Repeat and follow the same work Round 12 of sleeve.

Change color B:

Round21-22: Repeat and follow the same work Round 12 of sleeve.

Change color A:

Round23-28: Repeat and follow the same work Round 12 of sleeve.

Change color B:

Round29-36: Repeat and follow the same work Round 12 of sleeve. don’t stop make

Border band to start work.

Measurement Approx. from division of sleeves: 7 and ½  inches/19cm

Make Border Band of Sleeves:

Row 1- make chains 6, sc into 2nd ch from the hook, sc in each next 4 sts, make slip st

Into next 2 sts of round 36 of sleeves, turn work.(5sc)

Row2- skip slip sts, then make 1 sc into back loop next 5 sts, turn work. (5sc)

Row3- ch1, make 1 sc into back loop next 5 sts, make slip st into next 2 sts of round 36

Of sleeves, turn work. (5sc)

Row-4-26: repeat and follow the band row 2 and row 3.

Row 27: ch1, make 1 sc into back loop next 5 sts, do slip st into next 2sts of Round36.

Fasten off. Sew the band, use needle for sewing. Use whip st in each st.

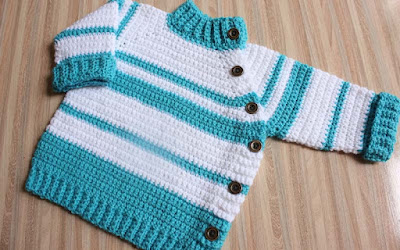
Finishing:  sew buttons on back side band of front showing in picture.

For more help watch video tutorial.


Monday 26 September 2022

How to Make Crocheted Fast & Easy Baby Beanie Hat Free Pattern Explain Sizes


Hello Friends and Followers! Today topic is crochet simple and easy Baby Beanie hat design for winter season. This adorable easy baby hat design in new fashion for infant babies 9-18 months to make the same buttoned sweater, and can be change easily for all boys /girls. you can make it in different colors larger or smaller. we explain below in my pattern for all sizes as you want make. we made for infant Baby 9-18 months size, we mentions about for all sizes in my video tutorial explain for you most easier to understand the pattern for baby hat  my video tutorial. Newest Pattern for Baby Buttoned Romper.


i love to make the sweaters and baby beanie hat in new design , It's a very special gift for cute and lovely kids to protect him/her form chilly season. We love and crochet baby items in the whole of the years and also shared in my own blog you always come here and watch my tutorial I am glad to see that you appreciated my designs and follow my work. thanks to follow me and thanks to all to share my free patterns to friend and other social media to expand my work.


i love to make and create new ideas for Baby accessories, like the pullover sweater designs, Baby Shoes designs, baby hats, baby blankets, Gloves Pattern and more. i hope you will like and appreciate my free pattern ideas, write about me, like, share to friends and also share on your Facebook page. on Pinterest. Thanks for watching to visit here.

Crochet Baby Shoes New Pattern// Lace up Booties Video you tube (Explain all sizes)

If you have any problem to understand the pattern, so, please share with me at the comment section, I will help as soon as possible. For more help watch the video tutorial. Follow my YouTube channel for more beautiful handmade patterns.


Instructions:  We made new stylish crochet buttoned sweater With a Baby Beanie Hat for 9-18 months size, you can easily to change the size as you want to make it, we explain in details about the sizes i my pattern and video tutorial below.. We add two of the colors in this sweater and Baby Beanie hat, you can chose any of other colors according to your taste. We used light DK weight wool 4ply with 5mm(H) crochet hook for this baby beanie hat. Size of the hat we mention below in the pattern. This baby elegant hat started bottom to top, we add simple stitch for the pattern, it’s very easy to start, we mention below about all sizes,  if you need a smaller or larger sizes, next Project will come another super pullover buttoned sweater. so, you can follow my other crochet ideas we mention below. We add a beautiful super easy my favorite pattern at front, explain in details hope you will like it.

All my free crochet pattern originally share in my web page share video tutorial on my YouTube channel(crochet-crosai) . Hope you will be enjoys my new ideas with simple pattern and shares the same videos too.

for more beautiful crochet videos watch in my you tube channel

changing for Sizes:

0-3 Months: Rib Band Size: 48 Rounds of single crochet =

Hat Circumference = 12-13/34 cm •  Height hat = 5.5"

3-6 Months: Rib Band Size: 50 Rounds of single crochet = 

Hat Circumference = 13-14/36 cm •  Height hat = 6"

9-18 Months: Rib Band Size:54 Rounds of single crochet = 

Hat Circumference = 14-15/38cm  •  Height hat = 7"

Toddler & Small Child (Approximately 1 to 5 years - 
 Rib Band Size: Hat Circumference = 16-17"  •  Height hat = 7.25"

Child (Approximately 5 to 10 years - 
 Rib Band Size: Hat Circumference = 18"  •  Height hat = 7.5"

Teen / Small Adult :  Hat Circumference = 19"  •  Height hat = 8"

Medium Adult :  Hat Circumference = 20"  •  Height hat = 8"

Large Adult :Hat Circumference = 21.75"  •  Height hat = 8.25"

For more help watch the (video tutorial)

  Download instructions at the top of the page. 

Item to be need:

wool: 80-100 Grams DK Weight Acrylic 4 ply yarn (16-20 = 4 inches)

Crochet hook size:  5mm(H) 

 Size:      9-18 months Infant Baby

Gauge:  4 stitches x 4 rows = 1 inch

 Pattern for gauge:  

Hat Circumference = 14-15"  •  Height hat = 7"

 Special stitch:

1.     1-Check out the size of beginning Ribbing band.


           US Terms Abbreviation

·         Ch   chains

·         st     stitch

·         Sc    single crochet

·         Hdc  half double crochet

·         Dc    double crochet

·         trb    treble crochet

·         Sts    Stitches

·         Sl st   slip stitch

           Bl      Back loop

           FP      Front Post  

           BP      Back Post


Color B:

Make Rib Band:

Make chains 6,

Round1- sc into 2nd ch from the hook, make 1 sc in each ch across to end, turn work. (5 sc)

Round2- ch1 count, skip 1st st, make 1 sc into back loop in each next 4 sts, turn work. (5 sc)

Round3-54: Repeat and Follow the same work as we worked in Round 2 of Rib Band.

Measurement of Rib Band 54 Rounds= 14-15 inches/36-38cm

Close the Band.

Work. Sew and close the band, hold both sides first round and last round 5 stitches together,

Make 1 slip st in each both sts together. Fasten off

Hat Top Part:

Now working into Rib Band edging:

Round1- ch1, make 1 sc in each st around the band edging, do slip st to join into ch1, 

turn work (54 sc)

Round2- ch1, make 1 sc in each st around, do slip st to join into ch 1, turn work. (54)

Round3-6: Repeat and follow the same work as we done in Round 2 of hat.

Change color A:

Round7-12: Repeat and follow the same work as we done in Round 2 of hat.

Measurement Approx. = 4 and ½ inches/ 11cm

Change color B:

Round13- ch1,* make 1 sc in each next 6 sts, then make 2 sc together *, Repeat form * to *

around, do slip st to join into ch1, turn work. (48 sc)

Round14- ch1, make 1 sc in each st around, do slip st to join into ch 1, turn work. (48)

Change color A:

Round15- ch1,* make 1 sc in each next 6 sts, then make 2 sc together *, Repeat form * to *

around, do slip st to join into ch1, turn work.

Round16- ch1, make 1 sc in each st around, do slip st to join into ch 1, turn work.

Round17-24: Repeat and follow the same work as we done in Round 15 & Round 16 of hat top part.

Measurement Approx. = 6 and ½ inches/ 17cm

Round25- ch1,* make 1 sc in each next 3 sts, then make 2 sc together *, Repeat form * to *

around, do slip st to join into ch1, turn work.

Round26- ch1,* make 1 sc in each next 2 sts, then make 2 sc together *, Repeat form * to *

around, do slip st to join into ch1, turn work.

Measurement Approx. = 7 inches/ 18cm. fasten off

Sewing:

Work: sew the top of the hat to close, use needle and a piece of yarn for sewing, use whip

Stitch for sewing the top of hat. Sew pom pom on top of hat, we explain in my

Video tutorial


Tuesday 20 September 2022

Crochet Buttoned Baby Sweater Fast Easy Pattern Explain Sizes New Style baby pullover sweater


Hello every one! Today topic is crochet pullover designs Buttoned sweater. This adorable, most elegant stylish sweater design made in new fashion  for kids and boys girls. you can make it in different colors and larger or smaller we explain below in my pattern. i made for infant baby 6-12 months size, we mentions and explain in details below for all sizes and also explain for you easy to understand to make the same in my video tutorial.
 
i love to make the sweater in new design at front panel embellished buttons. It's a very special gift for cute and lovely kids to protect him/her form chilly season. We love and crochet baby items in the whole of the years and also shared in my own blog you always come here and watch my tutorial I am glad to see that you appreciated my designs and follow my work. thanks to follow me and thanks to all to share my free patterns to friend and other social media to expand my work.
love to make Baby Patterns, like Baby Rompers, Baby Shoes, Baby Jackets, and share more for 


love the pullover sweater design and also the colors. i hope you will like and appreciate, write about me, like, share to friends and also share on your Facebook page. on Pinterest. Thanks for watching to visit here.

If you have any problem to understand the pattern, so, please share with me at the comment, I will help as soon as possible. For more help watch the video tutorial. Follow my YouTube channel for more beautiful 
Instructions:  We made this crochet baby buttoned sweater for 6-12 months size, you can easily to change the size as you want to make it, we explain in details about the sizes i my pattern and video tutorial below.. We are add two of the colors in this sweater, you can chose any of other colors according to your taste. We used light DK weight yarn with 3.5mm(E) crochet hook for this pullover round neck buttoned sweater. Size of the length we mention below in the description. This baby elegant sweater with sleeves is crocheted form the border bottom to top, we add simple stitch at front of sweater, it’s very easy to start, we mention below about all sizes,  if you need a smaller or larger sizes, all 4 panels worked to the same way only change size of the ribbing for sleeves. so, you can follow my other crochet ideas we mention below. We add a beautiful super easy my favorite pattern at front, explain in details hope you will like it.

All my free crochet pattern originally share in my web page share video tutorial on my YouTube channel(crochet-crosai) . Hope you will be enjoys my new ideas with simple pattern and shares the same videos too.

for more beautiful crochet videos watch in my you tube channel

changing for Sizes:

0-3 Months Ribbing Band Size: 46 Rounds of single crochet = 9 inches /23 cm

3-6 Months Ribbing Band Size: 50 Rounds of single crochet = 10 inches /26cm

6-12 Months Ribbing Band Size:54 Rounds of single crochet = 11 inches /28cm

12-24 Months Ribbing Band Size:60 Rounds of single crochet = 12 inches /30cm

Toddler 2-5 years Ribbing Band Size:66 Rounds of single crochet = 13 inches /33cm

Toddler 5-8 years Ribbing Band Size:70 Rounds of single crochet = 14 inches /36cm

Toddler 10-12 years Ribbing Band Size:76 Rounds of single crochet = 15 inches /38cm

For more help watch the (video tutorial)

  Download instructions at the top of the page. 

Item to be need:

wool: 200 Grams DK Weight Acrylic 3 ply yarn (5 hdc X 3 Rows = 1 inch)

Crochet hook size 3.5mm (E)

Buttons 

 Size:      6-12 months Baby Boys/Girls

Gauge:  5 hdc x 3 rows = 1 inch

 Pattern for gauge:  

chest size: 22 inches

length from shoulder to border: 13 inches/33cm

Sleeves length form shoulder to cuff : 13 inches/33cm

 Special stitch:

1.       1-Do stitch marker for neck line and shoulder making

2.       2-Check out the size of beginning Ribbing band.


           US Terms Abbreviation

·         Ch   chains

·         st     stitch

·         Sc    single crochet

·         Hdc  half double crochet

·         Dc    double crochet

·         trb    treble crochet

·         Sts    Stitches

·         Sl st   slip stitch


6-12 Months Ribbing Band Size:54 Rounds of single crochet = 11 inches /28cm

Make Front and Back Panels:

Make Ribbing Band:

Color B:

Make chains 9,

Row1- sc into 2nd ch from hook, make 1 sc in each ch across to end, turn work.(8 sc)

Row2- ch1 we count 1st st, skip 1st sc, make 1 sc in each next 7 sts into back loop across,

Turn work. (8 sc)

Row3-54: follow and Repeat the same work as we done in Ribbing Row 2.

Measurement Approx.: 54 Rows = 11 inches/28cm

Make Sweater Body:

Now start working into edging of Rib band.

Round1- ch1 not count, make 1hdc into same st, make 1 hdc in every st across into edging of

Rib band, turn work. (54 hdc)

Color A:

Round2- ch1 not count, make hdc into same st, make 1 hdc in each st across to end, turn work.

(54 hdc)

Round3- Do and follow the same work as we done in Round 2 of sweater.

Color B:

Round4-5: Do and follow the same work as we done in Round 2 of sweater.

From Round 6-21: Do and follow the same work as we done in Round 2 of sweater,

Changing color after make 2 Rounds.

Measurement Approx. from Rib band: 7 inches /18cm

Make Shoulder and neck shape:

Color A:

Round1: make button band, ch1 not count, make 1sc into same st into back loop, 1 sc in each next

 5 sts back loop, Then make 1 sc in each next 42 sts across , at the end make button band , 

make 1sc in each back loop Next 6 sts, turn work. (54 sc)

Round2 – ch1 we count, skip 1st st, make sc into back loop next 5 sts of button band, then make

2 sc together 1 time, then make 1 sc in each st across, at the end make button band make 1 sc in

 each back loop Next 6 sts, turn work.(53 sc)

Round3-25: Do and follow the same work as we done in Round 2 of shoulder and neck shape.

Measurement Approx. from shoulder: 12 cm

Round26- ch1 we count, skip 1st st, make sc into back loop next 5 sts of button band, then make

2 sc together 1 time, then make 1 sc in each st across, at the end sc together, then make button

 band make 1 sc in each back loop Next 6 sts, turn work.

Round27- ch1 we count, skip 1st st, make sc into back loop next 5 sts of button band, then make

2 sc together 1 time, then make 1 sc in each st across, at the end sc together, then make button

 band make 1 sc in each back loop Next 6 sts, turn work.

Round28- ch1 we count, then make 1 sc in each st Into back loop across to end, turn work. 

(24 sc)

Round29-31- ch1 we count, then make 1 sc in each st Into back loop across to end, turn work.

 (24 sc) . Fasten off

Measurement Approx. from Rib Band to neck line: 13inches /33cm

Make Sleeves X 2:

Make Ribbing Band:

Color B:

Make chains 9,

Row1- sc into 2nd ch from hook, make 1 sc in each ch across to end, turn work.(8 sc)

Row2- ch1 we count 1st st, skip 1st sc, make 1 sc in each next 7 sts into back loop across,

Turn work. (8 sc)

Row3-36: follow and Repeat the same work as we done in Ribbing Row 2.

Measurement Approx.: 36 Rows = 19 cm

Now working into edging of Rib band.

Round1- ch1 not count, make 1hdc into same st, make 1 hdc in each next 2 sts,* make

2 hdc into next st, make 1 hdc in each next 3 sts*,Repeat from * to * across to end,

Turn work. (42 hdc)

Color A:

Round2- ch1 not count, make hdc into same st, make 1 hdc in each st across to end, turn work.

(42 hdc)

Round3- Do and follow the same work as we done in Round 2 of sleeves.

Color B:

Round4-5: Do and follow the same work as we done in Round 2 of sleeves.

From Round 6-21: Do and follow the same work as we done in Round 2 of sleeves,

Changing color after make 2 Rounds.

Measurement Approx. from Rib band: 7 inches /18cm

Make Shoulder and neck shape:

Color A:

Round1: make button band, ch1 not count, make 1sc into same st into back loop, 1 sc in each

 next 5 sts back loop, Then make 1 sc in each next 30 sts across , at the end make button band ,

 make 1sc in each back loop Next 6 sts, turn work. (42 sc)

Round2 – ch1 we count, skip 1st st, make sc into back loop next 5 sts of button band, then make

2 sc together 1 time, then make 1 sc in each st across, at the end make button band make 1 sc in

 each back loop Next 6 sts, turn work.(41 sc)

Round3-24: Do and follow the same work as we done in Round 2 of shoulder and neck shape.

Round25- ch1 we count, skip 1st st, make sc into back loop next 5 sts of button band, then make

1 sc in each st across, at the end make button band make 1 sc in each back loop Next 6 sts,

turn work.(20 sc)

Round26-27: ch1 we count, skip 1st st, make sc into back loop next 5 sts of button band, 

then make1 sc in each st across, at the end make button band make 1 sc in each back loop 

Next 6 sts, turn work.(20 sc)

Round28- ch1 we count, then make 1 sc in each st Into back loop across to end, turn work. 

(20 sc)

Round29-31- ch1 we count, then make 1 sc in each st Into back loop across to end, turn work.

 (20sc). Fasten off

Sewing back panel to sleeves:

Work: sew back panel button band to sleeves bands, sew and use needle for sewing use whip 

stitch for sewing, leave the front panel bands for buttons. then sew sides of sweater and sleeves.

for more help watch video tutorial