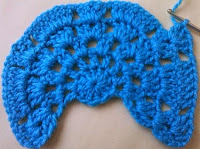
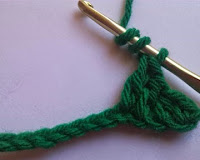
Sunday, 24 May 2015

CROCHET BUTTERFLY FREE PATTERN WITH PICTURES


Everyone on earth is gifted with a talent by almighty Allah, but some are more creative than others due to the special talent. Knowledge always increased when it’s distributed, so I think its great share and discus the knowledge is the best way to use and take advantage of the knowledge. People who the keep the knowledge up to themselves are not and cannot be among the great ones. The best scholars are those who they learn and then burn a candle to in light the world. I myself, trying to distribute, share my ideas and creation with you, so we can make it more beautiful and creative in the future. So, lets come to the topic, as we are related to a very beautiful area of art, the Flowers, and whenever we think of flowers, we think of nature, the creations of the nature including flowers, trees, birds and of course the butterflies they most beautiful creation of nature. Whenever, we see them, we want to be colorful like them. 
We dream if we can have wings and fly like them. Though we can’t be butterflies neither we can fly like them, but still we can create beautiful butterflies. 
for more help watch the video tutorial:


Today I will teach you how to create a colorful butterfly. You can create it in different colors. I always try to add some pictures to make it easy and comprehensive, so even the beginners can get all the details. You can use it in children’s bags, hair bands and in decoration pieces.

ABBREVIATIONS

C.         CROCHET
CH.      CHAIN
SC.    SINGLE CROSIA
DC.       DOUBLE CROCHET
RND.   ROUND
SLS.     SLIP STITCH
ST.        STITCH
STS.      STITCHES

PATTERN:

FIRST WE MAKE A MAGIC RING.

rnd 1.     ch3, 12dc into the magic ring.
 rnd 2.     ch3, ch1, 1dc, repeat 7 times in each st around, at the end skip 3sts turn.


rnd 3.     ch4, 2dc, ch1, 2dc, repeat 6 times at the end 1 dc, turn.
rnd 4.     ch3, 1dc, ch1, 2dc, ch1, into the 2nd space, 4dc, ch1, (2dc, ch1, 2dc) into 
                the 3rd space repeat more 6 times. turn
     
       
rnd 5.     ch3, 1dc, ch1, 2dc, ch1, 8dc into the top of the 4dc sts, ch1(2dc, ch1, 2dc) into the
                previous row. across. at the end (2dc, ch1, 2dc). turn

rnd 6.     repeat round 5.
rnd 7.     ch3, 1dc, ch1, 2dc, ch2,(7sc into the double crochet sts) ch2( 2dc, ch1, 2dc) into the
               previous row, across.
rnd 8.     ch3, 1dc, ch1, 2dc, ch3(6sc into the single crochet sts) ch3, 6dc, ch3, across at the end
                ( 2dc, ch1, 2dc)  turn
rnd 9.     ch3, 1dc, ch1, 2dc, ch3(5sc into the single crochet sts) ch3,  into the 6dc,sts, skip
                2dc sts make shell into space (2dc, ch1, 2dc) turn.


work on butterfly wings

rnd 10.    work into the first wing of butterfly

 row 1.     ch3, 1dc, ch1, 2dc, ch3(4sc), ch3(2dc, ch1, 2dc).


 row 2.     ch3, 1dc, ch1, 2dc, ch3(3sc), ch3(2dc, ch1, 2dc).


        row 3.     ch3, 1dc, ch1, 2dc, ch3(2sc), ch3(2dc, ch1, 2dc).
        row 4.     ch3, 1dc, ch1, 2dc, ch3(1sc), ch3(2dc, ch1, 2dc).


 row 5.     ch3, 1dc, ch1, 2dc, ch1( 2dc, ch1, 2dc) sls.


  work into the 2nd wing. 
rnd 11.  repeat rnd 9, do and follow same work as Rnd 10.

rnd 12-13.work into the 3rd and 4th wing repeat rnd 9, 
do and follow same work as (Rnd10) for each wing, at the end slst.


make a feeler:


rnd14.     into the center of the 3sts slip knot and make 8ch.
                 1sc into the 2nd ch of the hook,in each sts across.

make again 8 ch,1sc into the 2nd ch of the hook,in each sts across, at the end sls.


completed.


Friday, 15 May 2015

Crochet Leaf pattern with lot of pictures


this is a simple crochet potholer.on the off chance that we see around we will see and feel that world is so lovely. The world is brimming with distinctive shading. Through act and scene we will make it our surroundings more delightful.

Green valleys, wonderful flowers and green trees more appealing for human life yet leaves can more make excellent our surroundings. Today I feel that we will speak and examine about the flowers and leaves when we decorated the vase from flowers yet without leaves our vase won't look hitter on the grounds that each shading flowers need green shading takes off. So I feel that why not I can impart my reasoning and perspective to you people groups so you have to consider this for all the more better creation.

I will clarify how you will make the leaf. I clarify here the straightforward way/procedure. When you will take in the fundamental configuration of leaf then you will make more beautiful, sensible leaf then me. You will make it with an alternate shape like simple leaf, entire leaf, compound leaf,and many other kinds leaf.


instructions:  first of all i made a single crochet square shape piece and make the edges. after that i made a crochet stem on the potholder, then made a simple crochet daisy flower and sew on it. i made twice crochet leaves and sow on both of the sides.

I explain very simple and easy way through the pictures and pattern. I am sure that you will understand. this is very simple and easy way to crocheting the leaf. step by step picture tutorial help you easy understand the pattern, i made a daisy flower too, its s o cute and perfect match to the leaf design. it is use for the decoration things in the kitchen, like using for the dish and many other way to use this simple idea and continue more to showing you the sample of the things. i hope you will enjoy and easy to understand. 


ABBREVIATIONS US TERMS
C.         CROCHET
CH.      CHAIN
SC.    SINGLE CROCHET
HDC. HALF DOUBLE CROCHET
DC.       DOUBLE CROCHET
TRB     TRIBAL CROCHET
RND.   ROUND
SLS.     SLIP STITCH
ST.        STITCH
STS.      STITCHES
PATTERN:
Rnd 1.     Make a chain 11.

Rnd 2.     1sc into the 2nd chain from the hook.

Rnd3.     1hdc into the next chain.
Rnd 4.     2dc into the next chain.
Rnd5.     2 trb into the next chain.

Rnd 6.     2dc into the next chain.
Rnd7.     1hdc into the next chain.
Rnd8.     1sc into the last chain.

work into the opposite side. 

Rnd 9.   work into the opposite side (1sc, 1hdc, 2dc, 2 trb, 2dc, 1hdc, 1sc).

completed.


you may also like:


Monday, 11 May 2015

Crochet Coasters Designs


Although in my mind always different design  but I generally attempted to do that for you some new, simple approach to learn , straightforward me. Today I learn you a basic crochet design. Where you can use in this example different shading  in light of the fact that the shading blend is fundamental thing that you will make a large portion of lovely creation in crochet design and you can make it  as a large and in a little size.

You can utilize easily use in a different area like table covers, kitchen mat  and more different thing as you need. You can make it in a different shapes like square and octagon etc. Use it your own particular personality here.


this is a small coaster designs i made in the worsted yarn in different colors,all the colors are bright and very attractive .its using for the home decoration and for the kitchen. its very easy to make originally share with you. its a lovely design i made it for my home decorating. 
i made the octagon and a square also using for the blankets and for the table covers and you added many of the things.


Greatest configuration look like exceptionally difficult and make it in hard way. Which may be hard to see however I attempted to instruct the straightforward route  to make it simple. I bounce that you will have the capacity to effortlessly comprehend my design. On the off chance that you don't comprehend  and face troublesome you can contact me. i am showing you some other simple and easy designs to use any where,and want to make other things. i hope you will enjoy this easy and simple design. if you have any problem to understand the pattern so write about it i will help.


Item need for this pattern 
worsted yarn 4 ply different color wool
small hook 3 mm,

US Terms
ABBREVIATION

Ch     chain
Sc     single crochet
Dc     double crochet
Sts    stitches
St      stitch
Slst     slip stitch
Rnd    round

PATTERN:

make a magic circle.
Rnd 1.     ch3, 1dc into the magic circles, ch1, 1dc, repeat (10 times), slst
               slst into ch space.
change color:
Rnd 2.     ch3, 2dc into the same ch- space, 3dc into the next ch -space,repeat 
                 around, slst.
change color:
Rnd 3.     ch5, skip 2 sts, 1dc in next st, repeat(1dc, ch2, skip 2sts) around,
               slst into 3rd ch.
change color:
Rnd 4.     ch3, 3dc into the same ch space, ch1, 4dc into the next ch-space, repeat
               (4dc in each ch -space, ch1) around, slst. 
 change color:
Rnd 5.     1sc into the ch- space, ch5 and slst into the next ch -space, repeat around,slst.
                  
Note:   we make total 15 spaces.work into the spaces.
Rnd 6.     sc,4dc, ch2, 4dc sc, slst into same ch- space, slst into the next ch -space, 
                 repeat (sc,4dc, ch2 4dc,sc, slst in each ch -space) around, slst. 
Fasten off and weave in end neatly. 
 
Make Octagon

 PATTERN:

MAKE  A MAGIC RING.

Rnd 1.     ch3, 1dc, ch2, 2dc, repeat total( 4 times), slst.

make total 6 corners.

change color:

Rnd 2.     ch3, 1dc, into next st, make corner into ch space(1dc, ch2, 1dc), 
                   repeat(1dc in 2sts, make corner(1dc, ch2, 1dc) total(6 times), slst. 
change color:          

Rnd 3.     ch3, 1dc in next 2 sts, , make corner into corner space(1dc, ch2, 1dc), 
                  repeat(1dc in 3 sts, make corner(1dc, ch2, 1dc) total (6 times), slst.
                  Fasten off

Make Square 
               

PATTERN:

make a Magic ring.

Rnd1.     ch3(as count), 2dc, ch1, 3dc, repeat total(4 times), slst.

we make total 4 corners.

Rnd 2.     ch3, 1dc in next 2 sts,make a corner(1dc,ch2,1dc), repeat(1dc in 2 sts,
                  corner(1dc, ch2, 1dc) repeat total(4 times) at the end1dc in last corner 
                  space ch2, slst in top of ch3.
Rnd 3.     ch3,1dc into middle space into dc,1dc in next 2 paces, make a corner
                  (1dc, ch2,1dc) repeat( 1dc into next 3 middle spaces in dc st, make 
                  corner(1dc, ch2, 1dc) total (4 times) at the end,1dc in last corner space,  
                  ch2, slst in top of ch3. Fasten off