
Snowfall has been begun; climate
is totally cold in Abbottabad because of cool breeze. I believe that it does
have had to make such matters like sweaters, hats and cowl to avoid wasting our
body from this cold. This season continually want hot things made by way of hot
yarn. I made this sweater in one more colors yarn and use vivid colors for the
reason that girl consistently look like very gorgeous with brilliant colors
yarn. I made it for my cousin daughter. She may be very lovely girl; I really
like her very a lot.
In my future initiatives I
determined that I’ll make continue sweaters, frocks and so on pattern as a
result of demand of my household and neighbors. I will make those dresses for
my relatives and friends and share pattern with you peoples. The dimensions of
the sweater belong to 2 or 3 years girl.
I made this sweater in a very
simple form; I use exclusive combo of colors to look like wonderful. Secondly I
want to give an explanation for here that Crochet Designers at any time when
completed their venture, it have definitely remain additional yarn from his/her
project. It has got to retailer. It is vitally essential to retailer these
pieces of distinctive colors yarn. Use it just I used in this pattern. No have
got to use any unique sew; simply mix the colors with a simple way. You're
going to make cute crochet design as you wish to have. You are going to get
monetary savings, time and this is called crochet ability.
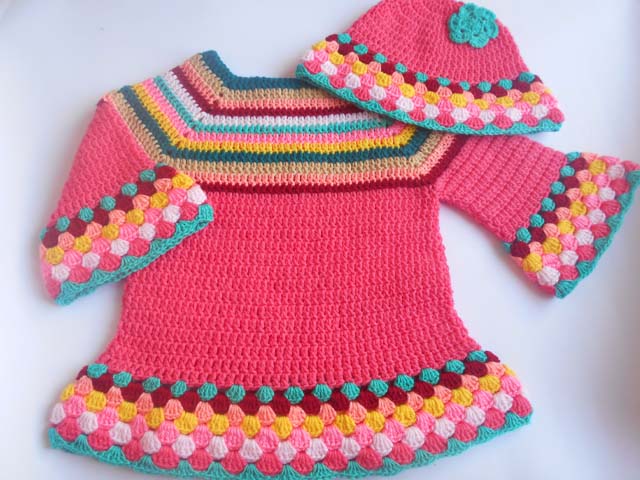
I explained in my pattern that I used
two different stitches. I made the upper part with simple double crochet and the
below part of sweater I used shell stitch with a different colors yarn. I taught
a design made by different color with simple stitches that look like interesting
and adorable. For more I made hat with sweater and use the above pattern and
colors.
I defined in my sample that I
used two exceptional stitches. I made the higher part with simple double crochet
and the below part of sweater I used shell stitch with in and added with different colors to matching a new idea. I
taught a design made by exclusive color with easy stitches that look like
intriguing and adorable. For extra I made hat with sweater and use the above
pattern and colors.
I made higher part of sweater in
square shape. My next pattern will likely be in a circle shape.the crochet baby dress hat with mittensItem to be need:
Different colors DK #4 /Medium Weight 4ply(16-20 stitches =4 inches)
Crochet Needle
Hook size. 3mm / US D 3.25mm
size: 2 -3 years girls.
US Terms Abbreviation:
C. crochet.
ch. chain.
sc. single crochet.
dc. double crochet.
sts. stitches.
st. stitch
slst. slip stitch.
Special Stitch: Shell stitch (5 double crochet in same stitch)


Make a hat:


US Terms Abbreviation:
C. crochet.
ch. chain.
sc. single crochet.
dc. double crochet.
sts. stitches.
st. stitch
slst. slip stitch.
Special Stitch: Shell stitch (5 double crochet in same stitch)
PATTERN:

To begin with the neck line.
Rnd 1: make a foundation chain 70, slst into 1st
ch and make a circle .
Divided the stitches into four
parts (14+14 sts arm parts) (22+22 sts front and back)
Always slst into the middle of
back part (corner dc as count).


Rnd 2: (ch3 as count)1dc in each of the sts back part (10dc)
make a corner (1dc, ch2, 1dc)
1dc in each of the next sts
arm part (12dc) make a corner (1dc, ch2, 1dc)
1dc in each of the next sts
front part (20dc) make a corner (1dc, ch2, 1dc)
1dc in each of the next sts
second arm part (12dc) make a corner (1dc, ch2, 1dc)
1dc in each of the next sts
back part (10dc) slst into the dc.
Rnd 3: (ch3 as count) into the back part (1dc into 22sts) make a
corner (1dc, ch2, 1dc)
1st arm part (1dc
into 14sts) make a corner (1dc, ch2, 1dc)
Front parts (1dc into 22sts)
make a corner (1dc, ch2, 1dc)
2nd arm part (1dc
into 14sts) make a corner (1dc, ch2, 1dc)
Rnd 4: (ch3 as count) into the back part (1dc into 24sts) make a
corner (1dc, ch2, 1dc)
1st arm part (1dc
into 16sts) make a corner (1dc, ch2, 1dc)
Front parts (1dc into 24sts)
make a corner (1dc, ch2, 1dc)
2nd arm part (1dc
into 16sts) make a corner (1dc, ch2, 1dc)
Rnd 5: (ch3 as count) into the back part (1dc into 26sts) make a
corner (1dc, ch2, 1dc)
1st arm part (1dc
into 18sts) make a corner (1dc, ch2, 1dc)
Front part (1dc into 26sts)
make a corner (1dc, ch2, 1dc)
2nd arm part (1dc
into 18sts) make a corner (1dc, ch2, 1dc)

Rnd 6: (ch3 as count) into the back part (1dc into 28sts) make a
corner (1dc, ch2, 1dc)
1st arm part (1dc
into 20sts) make a corner (1dc, ch2, 1dc)
Front part (1dc into 28sts) make a
corner (1dc, ch2, 1dc)
2nd arm part (1dc
into 20sts) make a corner (1dc, ch2, 1dc)
Rnd 7: (ch3 as count) into the back part (1dc into 30sts) make a
corner (1dc, ch2, 1dc)
1st arm part (1dc into
22sts) make a corner (1dc, ch2, 1dc)
Front parts (1dc into 30sts)
make a corner (1dc, ch2, 1dc)
2nd arm part (1dc
into 22sts) make a corner (1dc, ch2, 1dc)
Rnd 8: (ch3 as count) into the back part (1dc into 32sts) make a
corner (1dc, ch2, 1dc)
1st arm part (1dc
into 24sts) make a corner (1dc, ch2, 1dc)
Front part (1dc into 32sts)
make a corner (1dc, ch2, 1dc)
2nd arm part (1dc
into 24sts) make a corner (1dc, ch2, 1dc)
Rnd 9: (ch3 as count) into the back part (1dc into 34sts) make a
corner (1dc, ch2, 1dc)
1st arm part (1dc
into 26sts) make a corner (1dc, ch2, 1dc)
Front part (1dc into 34sts)
make a corner (1dc, ch2, 1dc)
2nd arm part (1dc
into 26sts) make a corner (1dc, ch2, 1dc)
Rnd 10: (ch3 as count) into the back part (1dc into 36sts) make a
corner (1dc, ch2, 1dc)
1st arm part (1dc
into 28sts) make a corner (1dc, ch2, 1dc)
Front part (1dc into 36sts)
make a corner (1dc, ch2, 1dc)
2nd arm part (1dc
into 28sts) make a corner (1dc, ch2, 1dc)
Rnd 11: (ch3 as count) into the back part (1dc into 38sts) make a
corner (1dc, ch2, 1dc)
1st arm part (1dc
into 30sts) make a corner (1dc, ch2, 1dc)
Front part (1dc into 38sts)
makes a corner (1dc, ch2, 1dc)
2nd arm part (1dc
into 30sts) make a corner (1dc, ch2, 1dc)
Rnd 12: (ch3 as count) into the back part (1dc into 40sts) make a
corner (1dc, ch2, 1dc)
1st arm part (1dc
into 32sts) make a corner (1dc, ch2, 1dc)
Front part (1dc into 40sts)
make a corner (1dc, ch2, 1dc)
2nd arm part (1dc
into 32sts) make a corner (1dc, ch2, 1dc)
Rnd 13: (ch3 as count) into the back part (1dc into 42sts) make a
corner (1dc, ch2, 1dc)
1st arm part (1dc
into 34sts) make a corner (1dc, ch2, 1dc)
Front part (1dc into 42sts)
make a corner (1dc, ch2, 1dc)
2nd arm part (1dc
into 34sts) make a corner (1dc, ch2, 1dc)
Rnd 14: (ch3 as count) into
the back part (1dc into 44sts) make a corner (1dc, ch2, 1dc)
1st arm part (1dc
into 36sts) make a corner (1dc, ch2, 1dc)
Front part (1dc into 44sts)
make a corner (1dc, ch2, 1dc)
2nd arm part (1dc
into 36sts) make a corner (1dc, ch2, 1dc)
Note: when we finish the
increasing of the arms, front and back stitches and then
work into the body of the sweater join the front and back
and work around the
body up to down.

Rnd 15: ch2, 1dc in each st across front and back
(44+44=88sts) slst into the 1st ch.
Rnd16-29: ch2, 1dc in each st across (88sts) repeat
around, slst into the 1st ch.

Rnd30: make a shell: ch2, 4dc into the same st,
skip 2sts, make a shell into
the next st(5dc) Repeat (shell 5dc, skip 2sts,
shell 5dc) across,
slst into the 1st ch.

Rnd31-37: into the end of the round cut the yarn and
change a new color.start
work into the 2nd round. Repeat (make a
shell (5dc) into the middle
space of the 2shells into the previous round). Fasten off
Make the arm part:

Rnd1: ch2, 1dc in each st across (36sts)
Rnd2-8: repeat (rnd1)

Rnd9: make a shell: ch2, 4dc into the same st,
skip 2sts, make a
shell(5dc) into the next st, Repeat (shell 5dc, skip 2sts,
shell 5dc)
across, slst into the 1st ch.
Rnd10-16: into the end of the
round cut the yarn and change a new color.
start work into the 2nd
round. Repeat (make a shell (5dc) into
the middle space of the 2 shells into the
previous round). Fasten off
Work the 2nd arm part:
Follow the 1st arm
pattern and continue work to finish.

Rnd 1:
make a circle. Ch 3, 12 dc in circle. Join to first dc with a slst. (12
dc)
Rnd 2:
Ch 3, 2dc in each stitch around, join with slst to first dc in round.
(24 dc)
Rnd 3:
Ch 3, 1dc in first st, 2dc in next st, repeats [dc, (dc, and 2dc in next
st)] around,
Join with slst to first dc in round. (36 dc)
Rnd 4: Ch
3, 1dc in first 2 sts, 2dc in next st, repeat [dc, (1dc, 2sts, 2dc in next st)]
around,
Join with slst to first dc in round. (48 dc)
Rnd 5: Ch
3, 1dc in first 3 sts, 2dc in next st, repeat [dc, (1dc, 3sts, 2dc in next st)]
Around, join with slst to first dc in round. (60 dc)
Rnd 6: ch
3, 1dc in each st round. (60 dc)
Rnd 7-10: repeat (rnd 6)
Rnd
11: make a shell: ch2, 4dc into
the same st, skip 2sts, make a shell into the
next st (5dc) Repeat (shell 5dc, skip 2sts, shell 5dc)
across, slst into the 1st ch.
Rnd
12-18: into the end of the round cut the yarn and change a new
colour.start work
into the 2nd round. Repeat (make a shell (5dc)
into the middle space of the
2shells into the previous round)
Make a Flower:
Make a magic ring.
Rnd 1: ch2, 11 dc into the magic ring (12dc)
Rnd 2: (1sc, ch2, 1sc) skip st (1sc, ch2, 1sc) repeat
6 times.
Make a petal.
Rnd 3: into the 1st space (slst, ch2,
6dc) repeat work all the petals (slst, ch2, 6dc)
Finishing: When we finish
the flower cut the yarn into the length and sew to the top right side on the
hat with a crochet needle.

Hi i was trying to attempt your pattern but can't understand how to get past round 2 the spacing is written wrong and doesn't work out.
ReplyDeletesorry i was wrong in 72. it is 70 and also upload one picture. thanks once again to guide me.
ReplyDeleteBeautiful set!! Thx for making it free!!! I'm getting the yarn for this tomorrow!!! Can't wait!!
ReplyDeletethanks Donna Myers for your beautiful comments
ReplyDeleteaamragul
So adorable and easy to make! Thank you for sharing your time with us!
ReplyDeleteThanks RockSha Wolf !
Deleteaamragul
This is a beautiful dress for a little girl! Thank you so much for sharing your creativity! -teddy
ReplyDeletethanks to your complement.
Deleteaamragul
Muito Lindo
ReplyDeleteWhat size is it?
ReplyDeletesize: 2 or 3 years girl.
DeleteHello,
ReplyDeleteVery pretty set, I am making it for my daughter but instructions are not v clear as u said to chain 70 then when deviding it is 72. 2nd question is whether to make the corner (1dc CH 2 1dc) in same CH/sts ?
many thanks to share your problem.this is the right instructions. when you follow the written instructions your work will come out. 2nd answer when you making the dc into the ch after completing 10 dc make the corner into next ch,then make the arm part dc in each ch, and make corner into next ch, follow the same way to completing the first round.
DeleteThank for replying. Want to ask one more thing the upper coloured body part is of 13 rounds as in picture, but written instructions says 14 !!! I followed the colours and instructions n ended up on round 13 maroon colour just as the picture .....
ReplyDeleteok! but this picture i captured before finishing the top section.i used the pink color in round 13 and 14.for your more info you should see the the sleeve picture. if you want to use other colors in round 13 and 14, you do it. if you want more help you are welcome.
ReplyDeletedesigner aamragul
Is there a way to make this for an older girl? Like, is there math that you used to make it this size? I am thinking of a 5-6 year old girl.
ReplyDeletedo 80 chains for 5-6 years old.
Delete