
Hi! My new project the doll set .I made it for
the 9-10 inches boy doll set. It is very easy to crocheting; I am using two different
colors. It is a complete set; you also like the hat, booties, and gloves.
I used a half double crochet in
this pattern , for the band I used the front post and back post half double
crocheting work, to starting the gloves first I made the double crochet
foundation chain. To making the straps first conform the length of the sweater,
the pattern help you to crocheting them.


I think it is not a very difficult pattern
you understand it very easy, it is a simple way the boy set pattern, it is help
you to crochet a baby set to the same pattern, and if you need my help I will solve
your problem.
Item to be need:
Two color (white, Purple), worsted yarn 4ply
Crochet Hook 3 mm size
Crochet needle
Buttons
Special st: front post and back
post half double crochet
Size 9-10 inches boy doll set.
ABBREVIATIONS:
c. crochet
ch. Chain
sc single crochet
hdc half double crochet
dc. Double crochet
sts. Stitches
st. stitch
slst. Slip
stitch
dctog double crochet together
BP. Back post
FP. Front post
Main Color. White
2nd Color.
Purple
Doll Set Pattern:
Sweater Pattern:

First we start the round neck sweater, to begin into the band
with a second color.
Rnd 1: ch 61, 1 hdc
into the 3rd ch, 1 hdc in each st across,
join into the 2nd
ch, from the beginning. (60_
Rnd2: ch 1, 1 hdc
FP, 1 hdc BP, in each st around the band,
slst to join. (60)
Rnd4-13: ch 1, 1 hdc,
in each st around, slst to join. (60)
Make the
arm shape:
Rnd 14: ch 1, slst
into next 2 sts, 1 hdc in next 26 sts, leave the
2 sts un worked, turn. (26)
Rnd15-17: ch 1, 1
hdc, in each st across, turn. (26)
Make the
neck shape front side:
Work into the right side into the front:
Rnd 18: ch 1, 1 hdc
in next 11 sts, leave the 2 sts un worked into
the middle, turn. (12)
Rnd19: skip 2 sts, 1
hdc into next 10 sts, turn. (10)
Rnd20: ch 1, 1 hdc
in each st across. (10)
Work into the left side to the same.
back:
Work into the back and make the arm shape:
Work into the back and make the arm shape:
Rnd1: leave the 2
sts for the arm shape, 1 hdc into the next 26 sts,
leave the last 2 sts un
worked, turn.(26)
Rnd2-5: ch1, 1hdc
in each st across, turn.(26)
Make the
neck shape backside:
Rnd6: ch 1, 1 hdc
in 9 sts, slst into the next 6 sts, 1 hdc into next 10 sts,
Rnd7: repeat
(rnd 6)
Sew the shoulder into the wrong side and then work into the
arm part into both sides.
Rnd1-2: ch 1, 1 hdc
in each st around the arm hole, slst.(18)
Change the 2nd color:
Rnd3: ch 1, 1 hdc
in each st around, slst.(18)
Rnd4-5: 1 hdc FP, 1
hdc BP, around (18). Fasten off.
Make the neck band and use the main color white:
Rnd1: 1 sc, evenly
around the neck, slst.(24)
Work into the 2nd color:
Rnd2: ch 1, 1 hdc
in each st around the neck band, slst.(24)
Rnd3: 1 hdc FP, 1
hdc BP, around (24) fasten off.
Make the knickers
part:

Use the main color, start work into the middle, upper to
down:
Rnd 1: make ch 62,
1dc into 4th ch, 1 dc in each ch across,
change the 2nd
color, turn (60)
Rnd 2: ch 2, 1 dc ,
in each st across, change the color, turn(60)
Rnd3-8: repeat rnd
2, at the end change the color, turn (60)
Divide for legs:
Divide the sts into the two parts for the 2 legs (30+30)
always
change the color at the end.
Rnd9: ch2, 1 dc into
next 29 sts, turn.(30)
Decreasing round.
Rnd10: ch 2, dc tog
in next, 1dc in next sts, at the last 2 sts dc tog,
change color, turn(28)
Rnd 11: repeat (Rnd
9) (28)
Rnd 12: repeat (Rnd
10) (26)
Rnd 13: repeat (Rnd
9) (26)
Use the 2nd color:
Rnd 14: repeat (Rnd 9)
(26)
Rnd15-16: 1 dc FP, 1
dc BP, around (26). Fasten off.
Follow the 2nd leg part to the same.
Upper part of the knickers:
Divide the sts into 2 parts (front 30+back30)
Use the 2nd color, Start work into the front side
into the middle 26sts,
skip 2 sts in both corner of the front and back parts.
Use the st mark
into both of the sides, ch2 as count in front dc.
Rnd1: ch2, 1dc into
next 25 sts, leave 2 sts un worked, turn (26)
Decreasing round.
Rnd2: ch2, dc tog in
next, 1 dc in next sts, at the last 2 sts dc tog, turn (24)
Rnd3: ch2, 1 dc in
each st across, turn (24)
Rnd4: repeat (Rnd 2) (22)
Rnd5-6: repeat (Rnd
3) (22). Fasten off
Follow the back part to the same, at the end of rnd 6 we make
the straps for button.
Make a
strapes:
Rnd1: start into
the corner, pick 1 sc into 6 sts, ch1 turn (6sc)
Rnd2-23: sc into same
st, sc into next 5, ch 1, turn.(6sc)
Rnd24: ch 1, sc
into same st, sc into next, skip next 2sts, ch 2, sc into
next 2sts, ch1,
turn.(6)
Rnd25: ch 1, sc
into same st, sc into next, sc into ch 2, sc into next 2 sts (6).
Fasten off
Follow the 2nd straps to the same.

Finishing: use the
main color and sc around back and then the straps,
the front and the 2nd
strap. Sew the two buttons both of the front side.
Hat Pattern:

Rnd1: ch2, 11 dc into
the circle, slst.(12)
Rnd2: ch2, 2 dc in
each st around, slst(24)
Rnd3: ch2, 2 dc
into next st, repeat (1 dc, 2 dc) around, slst.(36)
Rnd4-8: ch2, 1 dc in
each st around, slst. (36)
Rnd 9-10: 1 dc FP, 1
dc BP, around, slst.(36). Fasten off
Gloves Pattern:
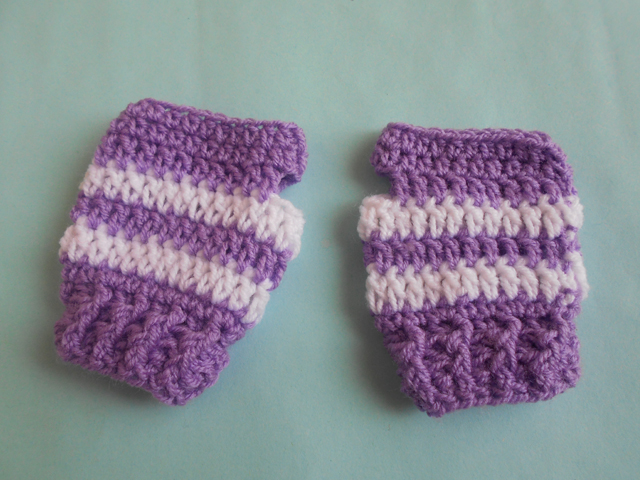
Rnd1: make a dc
foundation ch, slst to join (18 dc)
Rnd2-3: 1 dc FP, 1 dc
BP, around the band, slst to join.(18)
Rnd4: ch1, sc
into next, 2 dc into next, repeat (1 sc into 2 sts,
2 sc into next st), around the band, slst.(24)
Rnd5-7: ch2, 1 dc in each st around , slst.(24)
Rnd8: ch 2, 1 dc into next 9 sts, skip 4 sts, ch3, 1
dc into next
remaining sts, slst.
Rnd9-10: ch 1, 1,
hdc in next sts, hdc into the 3 ch, hdc in next sts,
slst(23). Fasten off
Follow the 2nd glove to the same way.
Booties Pattern:

Rnd1: ch 9, 2 sc
into 2nd ch, 1 sc in next 6, 5 st into last st, work into the
opposite,
sc into next 6 sts, 2 sc into the last st, slst. (21)
Rnd2: ch 1, 2 sc
into same st, 2sc in next, 1 sc in next 6,2 sc in next 5, work into
the
opposite, sc into next 6 sts,2 sc in last 2 sts, slst. (30)
Rnd3: ch 1, (2 sc ,
1sc 2 times) 1 sc in next 6, (2 sc , 1sc, 5 times) work into
the opposite, sc
into next 6 sts, (2 sc , 1sc 2 times)in last, slst. (39)
Rnd4: ch 1, 1 sc
into same st, 1 sc into next sts around, slst. (39)

Use 2nd color:
Rnd5: ch 1, 1 hdc
into back loop in each st around, slst.(39)
Rnd6: (ch 1as
count), 1 sc into 9 sts, (hdc tog, 9 times)1 sc into last 10 sts, slst.(30)
Rnd7: (ch 1as
count), 1 sc into 8 sts, [hdc tog 1time, dc tog 3 times,
hdc tog 1 time]1 sc
into last 8 sts, slst. (25)
Rnd8: (ch 1as
count), 1 sc into 8 sts, [hdc tog 1time, dc tog 3 times,
hdc tog 1 time]1 sc
into last 8 sts, slst. (21)
Rnd9: ch 1, 1 hdc
in each st around, slst. (21)
Rnd10-11: ch 1, 1 dc
in each st around, slst. (21)
Rnd12: ch 1, 1 sc
in each st around, slst. (21). Fasten off
Follow the 2nd bootie to the same pattern.

No comments:
Post a Comment